Batch print your documents most effectively with settings available in Print Conductor. You can adjust page range, double-sided printing, page collation, print cover pages, set printing documents in direct or reverse order, and more.
- Set page range
- Set the number of copies (Copies)
- Single print job mode: Ensure printing of documents in the order you've set
- Single print job + Duplex mode
- Adding an extra blank page in the end of a document
- Making sure the cover page is always on the front of the paper
- Single print job name
- Use different input printer trays in Single print job mode
- How to merge files into a PDF via Single print job mode & virtual printer
- Single print job + Duplex mode
- Print in duplex mode
- Set input printer tray (paper source)
- Set paper source for selected pages
- Set page collation
- Print password-protected documents
- Print document pages in reverse order
- Set post processing of files after printing
- Edit source files when they are being printed
- Change the TEMP folder for temporary files
- Preview documents before printing
- Disable printing blank pages
- Set print job names via built-in macros
- Print every N page(s) as a new print job
Set page range
In Print Conductor, you can specify a page range to be printed. It is possible to configure it for all or certain files in the List of Documents. To change page range, go to the Common settings and enter page numbers and/or page ranges separated by commas.

Here you can set:
- Single pages. For example: 1,3,5
- Page ranges separated by commas. For example: 1-5,20-25
- Pages from the end of a document (using the syntax last). For example: last,last1,last2,last3...
- Complex page range. For example: 1,5-10,12-last
- last – the last page
- last1 – page before the last one (the second page from the end)
- last2 – third page from the end
- etc.
Print odd or even pages
There's an additional option to print only odd or only even pages. To do it, use the Page range selection setting in the Advanced settings:

To set up page range:
- Go to Settings > Common;
- In the Page Range section, select Pages and enter the required page numbers or a page range.
- (optional) To set printing of even or odd pages, go to Settings > Advanced, find Page range selection option, and change it to the desired value.
- Click OK.
Skip repeated pages
There's a feature to avoid printing a unique page more than once, i.e., you won't have duplicate printed pages. For example, you have some documents with multiple pages and others with one page only. You set the page range to 1,last to print the last and the first pages only. As a result, you'll get some documents printed twice (and waste paper) since they consist of one page, which is the first and the last one. To avoid this situation, enable Skip repeated pages in the Advanced Settings.
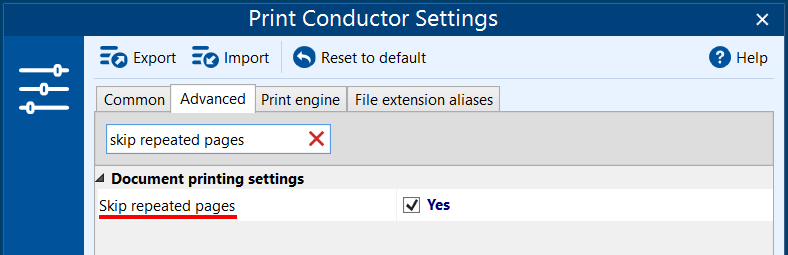
To avoid printing the same page more than once:
- Go to Settings > Advanced;
- Find the Skip repeated pages settings (start typing "skip repeated" in the search bar) and enable it;
- Click OK.
Set the number of copies (Copies)
The Copies setting allows you to specify the number of copies for all documents added to the List of Documents for future printing. You can access this setting on either the Common or Advanced tab (Document printing settings > Copies) in Print Conductor Settings.
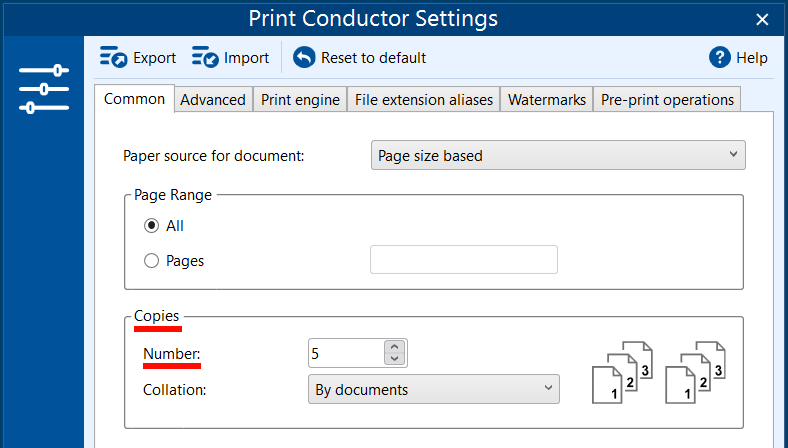
To set the number of copies:
- Go to Settings > Common;
- Select the desired number next to Copies > Number;
- Click OK.
Configure sorting of copies (collation)
When configuring the number of copies, you may also want to configure the Collation type, which determines how the printed copies should be sorted. By default, it is set to By documents, but you can choose By pages or As in printer if that’s what you need.
Print the entire List of Documents multiple times
If you need to print the entire List of Documents multiple times, for example, Document 1, Document 2, and Document 3 (each with a specific number of copies), use the Print file list N time(s) setting.
Learn more about printing the file list multiple times →
Set different number of copies using Item settings
If you need to set a specific number of copies for different items in the List, you can do so by selecting one or several items, right-clicking them, and choosing Item settings.... Here, you can configure individual settings, including copies.
Learn more about individual item settings →
Set maximum copies per job (Max copies per job)
![]() Changing this setting is recommended only if you have multiple copies of your documents and are experiencing performance issues, such as when printing is slow.
Changing this setting is recommended only if you have multiple copies of your documents and are experiencing performance issues, such as when printing is slow.
Some printer drivers can slow down printing by increasing the spool size, even when you're printing multiple copies of the same document.
To address this issue, the Max copies per job setting allows you to split large multi-copy print jobs into smaller parts. By setting a maximum limit on the number of copies, you can reduce the size of each print job and prevent performance issues, particularly when the spool size becomes very large.
For example, if you need to print 100 copies of a large file, you can set the maximum number of copies to 5. The program will then divide the 100-copy print job into 20 separate 5-copy jobs.
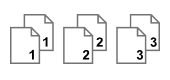
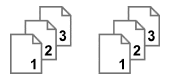
Single print job mode: Ensure printing of documents in the order you've set
When you add files to the List of Documents, sort them as you like and simply start printing, files will be sent further in the order you've set. Print Conductor sends them to the Windows print queue. The Windows printing system, however, might mix up the documents when sending them to a printer via print spooler service. To ensure printing of documents in a sorted order, enable printing all files as a single job.
Use the Single print job mode if you want your files to be printed in the exact same order as you've sorted them.

With Single print job enabled, you can also manage simultaneous printing by multiple users. This feature helps you print without getting your documents mixed up with other users' documents coming to the same printer in the office. The files will be sent to the printing device without interruption and other users' print jobs in the middle. And there will be no need to collate the printouts manually.
Single print job + Duplex mode
Adding an extra blank page in the end of a document
When printing as a single print job on both sides of the paper (using Duplex mode), an extra blank even page is added to each document with an odd number of pages by default. If you want to print the whole set of documents without blank pages in the middle, uncheck the Print extra blank even page in duplex mode option.

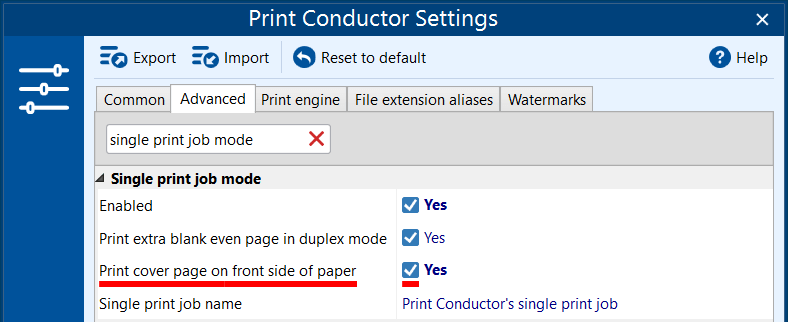
Making sure the cover page is always on the front of the paper
If you use cover pages in Single print job and duplex mode, you may experience an issue when the cover page is printed somewhere in the middle (not as first page). To make sure it is always on the first page of paper, turn on the option to Print cover page on front side of paper in the Advanced Settings.
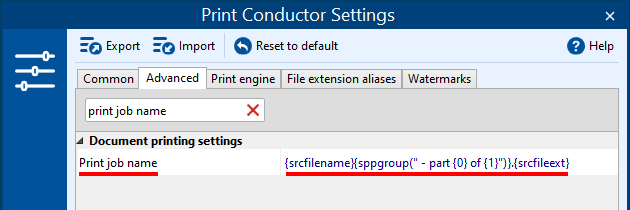
Single print job name
You can set a specific name for a batch of files printed in Single print job mode. It may be convenient to see what's printing and identify which job is having issues in case of any issue or error. Besides, if you're printing to a virtual printer, the output files' name usually matches the print job's name.

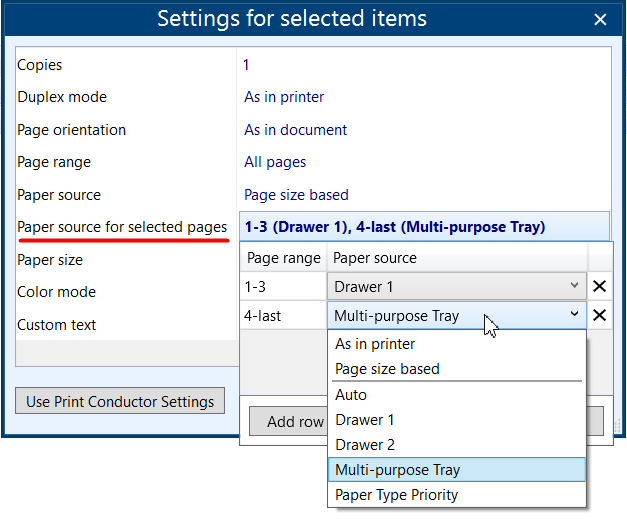
Use different input printer trays in Single print job mode
When printing with Single print job mode on, it may be necessary to receive source paper from different printer trays – for different files. You can add your files to the List of Documents, enable Single print job mode and select Paper source using the Item settings… menu:

You can select printer trays for individual items or groups of selected items.
To print files as a single print job:
- Go to Settings > Advanced;
- Find the Single print job section (start typing "single" in the search bar);
- Check Enabled;
- (optional) Disable the Print extra blank even page in duplex mode if this option is not wanted;
- (optional) Change Single print job name if needed
- Click OK.
How to merge files into a PDF via Single print job mode & virtual printer
Here's a tip if you want to send some documents to someone, and you don't need to print anything. For instance, if you have a set of documents to be sent to your remote colleague via the Internet, email, or a network. Using Print Conductor with Single print job mode on and virtual printer, you can combine various documents to a single PDF that can be quickly sent over to your colleague or business partner.
For example, you can use Microsoft Print to PDF. This printer is available for Windows 10 users, and it is most likely pre-installed in your system and available in the list of printers.

As a result, you'll get a multipage PDF document containing all your files (they could have different formats).
The method above can be handy if the recipient does not have a specific program installed, such as MS Office suite or AutoCAD. And it can help you stay productive with the software that you already have when sending multiple files.
To create a multipage PDF from several files:
- Add the necessary files to Print Conductor;
- Select a virtual printer that can save to PDF such as Universal Document Converter, Microsoft Print to PDF, or Adobe PDF (any virtual printer will do);
- Enable Single print job mode so that all files are combined into one multipage PDF;
- Start batch printing to PDF via the Start Printing button;
- Check your virtual printer's output folder.
Print in duplex mode
If your printer has a duplex printing feature, you can configure printing on both sides of the paper through Print Conductor. Double-sided printing can be enabled in the Advanced settings > Duplex mode:

- Simplex (single-sided printing)
- Long-edge binding. Double-sided printing using a vertical page turn in portrait; and horizontal page turn in landscape orientation;
- Short-edge binding. Double-sided printing using a horizontal page turn in portrait; and vertical page turn in landscape orientation;
- As in printer (as set in your printer properties)
Learn more about duplex printing →
Note
If you print a multipage text document in landscape orientation using duplex, disable the Auto rotate setting in Print Conductor. This way, the text will be placed normally – from top to bottom.

Print extra blank even page in duplex mode
Duplex printing can be combined with the single print job mode. In this mode, all files from the list are sent to the printer queue as a solid batch. If you use these modes together, Print extra blank even page in duplex mode option is on by default. This way, every new document (or next copy) will start from a new paper sheet. Alternatively, you can disable this option if you don't want an empty even page to be added between documents or document copies.
To print on both sides of the paper:
- Go to Settings > Advanced;
- Find the Duplex mode setting (start typing "duplex" in the search bar) and change it;
- (If Single print job is on) Uncheck Print extra blank even page in duplex mode option if you don't want an additional empty page;
- Click OK.
Set input printer tray (paper source)
If you have a professional-level printer with several input trays, this setting will come in handy. You can manually set the printer tray that will be used as a source for paper for all documents in the list. Change it in the Common settings:

You can set Paper source for document to a preferred option and choose between:
Besides, you can set a different printer tray for a specific document or a group of documents. To do it, select and right-click them, then choose the desired option next to Paper source. This will apply only to the selected item(s) in the List of Documents.

To select a paper source:
- Select printer;
- Go to Settings > Common;
- Select Paper source for document;
- (optional) Set a specific paper source for individual files in the list;
- Click OK.
Set paper source for selected pages
You can select different paper sources for specific pages or page ranges. To do it, use the setting Paper source for selected pages in the Item settings.
To use different paper sources for page ranges:
- Select printer;
- Add one or several files to the List of Documents;
- Select one or several items and right-click them;
- Click Item settings…
- Configure Paper source for selected pages setting as needed;
- Click OK.
Set page collation
Let's say you want to share a handout consisting of multiple files with ten people. By default, the printer usually prints the first document and all its copies (copy 1, 2, 3), then goes to the second document and its copies, and so on. Afterward, you will need to manually rearrange the paper sheets so that each person could get a proper handout.
Instead, you can use collated printing so that the documents are printed in sorted sets. Page collation is a handy feature if you have multiple copies of several documents to print and want to spend less time sorting paper.
Print Conductor can collate your printouts in three different ways:
By pages
All copies of a page are printed before printing copies of the next page. Page copies are printed together – printouts are arranged page by page: pages #1,1,1, pages #2,2,2, pages #3,3,3, etc. of first document's copies; then pages #1,1,1, pages #2,2,2, pages #3,3,3, etc. of second document's copies, and so on.
By documents
All copies of a document are printed before printing the next document. Document copies are printed together – all printouts are arranged document copy by document copy: document 1 (copies #1,2,3...), then document 2 (copies #1,2,3...), then document 3 (copies #1,2,3...), and so on.
As in printer
The page collation method is determined by your printer driver's settings (Printing preferences).
Changing this setting will only take effect when files in the List of Documents have multiple copies.
To set the type of collation:
- Go to Settings > Common;
- Find Collation setting and change it to the desired option.
Print password-protected documents
You can enter password for the source file, if it is password-protected, directly in Print Conductor interface. If you have more than one file secured with passwords, you can specify multiple passwords too. Find Password list entry in the Advanced settings and enter one or several passwords:

To input passwords for secured documents:
- Go to Settings > Advanced;
- Find the Password list setting (start typing "password" in the search bar);
- Enter one or multiple passwords on a separate line (press Enter when typing a new password);
- Click OK.
Print document pages in reverse order
Sometimes, you may need to print many pages in reverse order. If your printer produces pages face up, then you would probably be wasting time in re-sorting the printed pages of your document in the reverse order. Instead, you can set page printing to reverse. Do it using the Page print order setting:

By default, it is set to Direct. Changing print order to Reverse will print in reverse order – last pages of a multipage document will be printed first. This way, every document (such as Word or PDF) will be printed in back to front order.
To print pages in reverse order:
- Go to Settings > Advanced;
- Find the Reverse order setting (type "reverse" in the search bar);
- Change it to Reverse;
- Click OK.
Set post processing of files after printing
To reduce manual work, you can configure Print Conductor to automatically move, copy or delete processed documents after finishing the batch print session. Use control settings in the Post processing section:

![]() Learn how to use post processing actions
Learn how to use post processing actions
Edit source files when they are being printed
Need to keep working with the documents while Print Conductor is processing them? Just enable Keep source files available for editing setting. This way, you can open and edit your files while they're being printed.

To keep working with files while they're being printed:
- Go to Settings > Advanced;
- Find the Keep source files available for editing setting (start typing "keep source files" in the search bar) and check it;
- Click OK.
Change the TEMP folder for temporary files
You can change a folder where temporary files created by Print Conductor are located. By default, it is %TEMP% (C:\Users\[User]\AppData\Local\Temp).

To change temporary files location:
- Go to Settings > Advanced;
- Find the Temp folder setting (start typing "temp" in the search bar);
- Select another folder path by clicking the folder icon;
- Click OK.
Preview documents before printing
You can enable a preview that shows the first page of a selected item in the List of Documents (like the preview pane in File Explorer on Windows). This will help you quickly view all the documents added to the List before printing them.
To enable the preview pane:
- Go to Settings > Advanced;
- Find the Show preview pane setting (start typing "show preview" in the search bar);
- Change it to Yes;
- Click OK.
Disable printing blank pages
Sometimes documents may contain blank pages (usually at the end of a document). Print Conductor can detect such pages and skip printing them. To use this feature, enable the new Disable printing empty pages setting in the Advanced Settings.
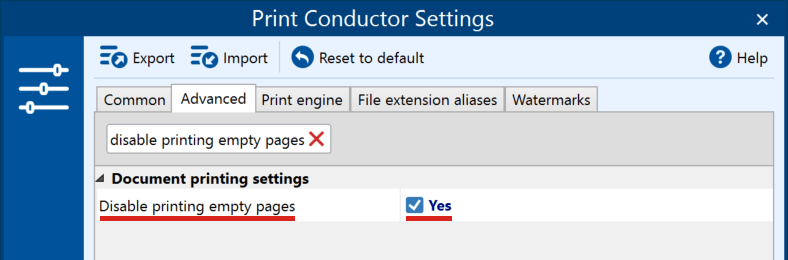
To avoid printing blank (empty) pages:
- Go to Settings > Advanced;
- Find the Disable printing empty pages setting (start typing "disable" in the search bar);
- Set it to Yes;
- Click OK.
Set print job names via built-in macros
It is possible to define the names of your print jobs. This can be particularly useful if you want to:
- Apply a naming convention when printing with a virtual printer
- Set a naming convention for copies of print jobs saved on a server
- View print jobs on the printer display and distinguish between them
Use the Print job name setting to configure renaming. You can use any text and/or built-in macros:
- {srcfilename} – stands for source file name
- {sppgroup(" - part {0} of {1}")} – stands for the group of pages (if the Print every N page(s) as a new print job setting is used)
- {srcfileext} – stands for source file extension
To set print job naming:
- Go to Settings > Advanced;
- Find the Print job name setting (start typing "print job" in the search bar);
- Configure the naming pattern as needed;
- Click OK.
Print every N page(s) as a new print job
Sometimes it may be necessary to split documents into parts consisting of a certain number of pages, for example, if stapling of copies is required. By using the Print every N page(s) as a new print job setting in Print Conductor, you can create separate print jobs, each with a specified number of pages.
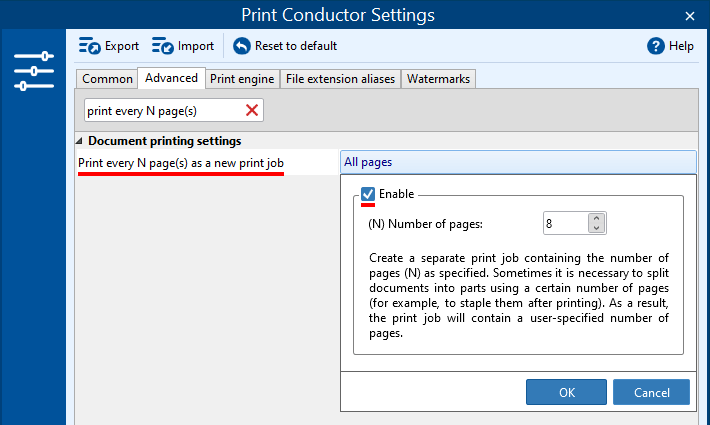
To define the number of pages to print for each new print job:
- Go to Settings > Advanced;
- Find the Print every N page(s) as a new print job setting (start typing "print every" in the search bar);
- Set it to Enable and specify the (N) Number of pages;
- Click OK.
See also:
How To
Get other useful guides on using Print Conductor and see many other useful how-tos, solutions, tips & tricks on effective batch printing. You'll find out how to import & export files, manage print lists, configure document and page settings, set up service pages, and so much more.
How to Print All Excel Sheets at Once in Batch Mode