Print Conductor enables you to add files for batch printing using various methods. You can do it manually or via loading lists. The program supports importing lists in TXT, FLIST, XLSX, XLS, and CSV format as well as adding files contained in ZIP, RAR, or 7ZIP archives. Loading a previously saved list can be done either by clicking the Import button or by double-clicking the FLIST file or drag-dropping it onto the Print Conductor main window. Let's look into more features related to adding files.
Learn how to:
- Drag files and drop them to the list
- Use Add Documents and Add Folder buttons
- Add documents from a ZIP, RAR, or 7ZIP archive
- Import a list of files from a TXT file
- Import a list of documents from an Excel file (XLS, XLSX, CSV)
- Load a list from Print Conductor's FLIST file
- Load files from selected folders at program start
- Add files that have a non-standard file extension
- Add the same files to the List more than once (Unique content in file list)
- Quickly send files to Print Conductor using the right mouse click (Add to Windows Explorer context menu)
First off, select a printer that you want to send your list of files to. Then add your files into Print Conductor using one of the methods described below.
Drag files and drop them to the list
To add files to Print Conductor, select one or several files and drag them to the main window of the program, then release the mouse button. You can quickly add all files contained in a folder, too. Just open a folder, press Ctrl + A, drag the selected items and drop them onto Print Conductor main window:

Use Add Documents and Add Folder buttons
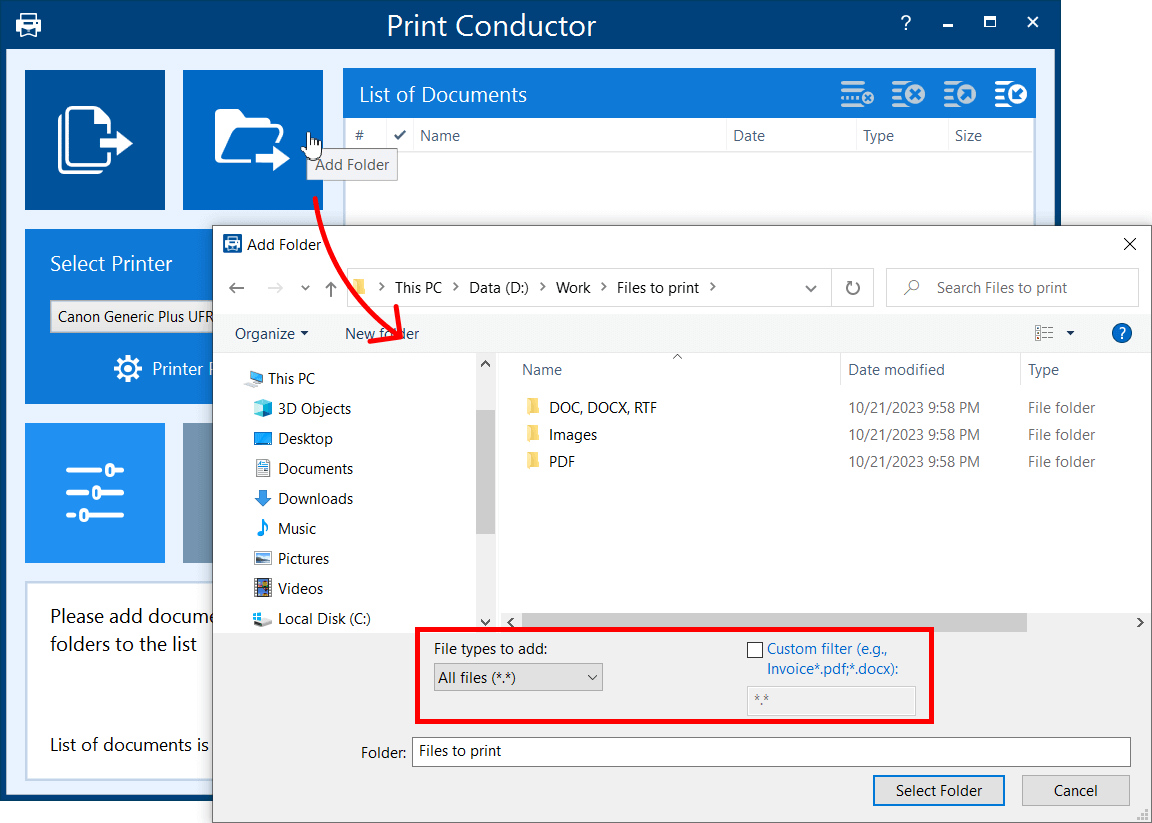
Alternatively, you can import files by clicking the Add Documents button. This button opens a window where you can browse for files. Here you can select between all supported file formats or only certain ones. Add Folder button allows importing an entire folder of files.

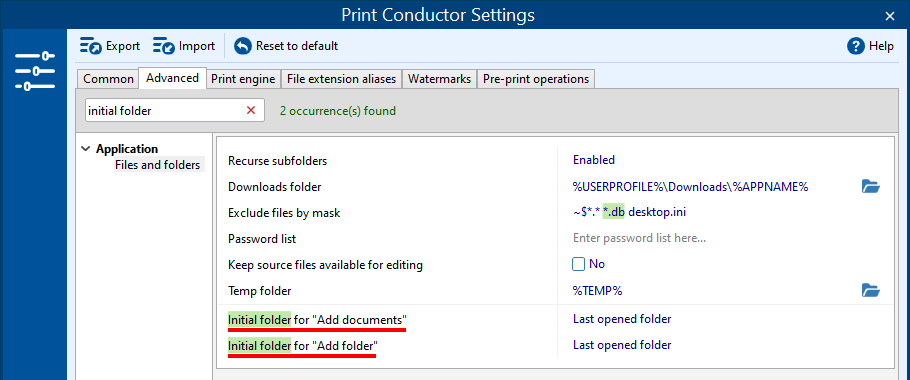
You can customize which folder opens when you click either of these buttons. To configure it, find the Initial folder for "Add folder" and Initial folder for "Add documents" settings in the Advanced Settings and change them. By default, the initial folder is the last opened folder.
How to add only specific file types from a folder using Custom filter
Sometimes you only need to add specific files, not all of them. When selecting a folder of documents to add, you can use "File types to add" or set "Custom filter" settings in the lower part of the window.
File types to add
"File types to add" allows you to select a file format from the dropdown list. For example: Microsoft Outlook Office MSG (.msg)
Custom filter (e.g., Invoice*.pdf;*.docx)
"Custom filter" lets you set a file mask filter with the use of wildcard characters like "*", "?", and custom text. The filter masks can be combined. See usage examples below.
The asterisk and question mark serve as wildcard characters, exactly as they would behave in MS-DOS or Windows.
- Asterisk (*). The asterisk is the wildcard character which stands for any string of characters (including no characters at all). In other words, it indicates zero or any number of characters.
Examples:*.* All files with any filename and any file extension will be added. *.pdf All files with any filename and file extension .pdf will be added. invoice.* All files with filename “invoice” and any file extension will be added. *invoice* All files with a filename containing “invoice” in their filename will be added. invoice*001.* All files with filename starting with “invoice” and containing “001” with any file extension (asterisk after the dot) will be added.There may be some characters between “invoice” and “001” (e.g. “invoice_template001”) or none. invoice.pdf Only files with PDF extension and filename "invoice" will be added. - Question mark (?). The question mark matches one single character. It indicates any random character in the filename.
Examples:invoice_??-??-????.pdf All PDF files with filename starting with “invoice_” and containing 8 characters in the place of question marks will be added (e.g. an invoice created on July 21, 2025 - invoice_21-07-2025.pdf) Item_type_?_ID_???.zpl All ZPL files, which have a filename containing "Item_type_" where item type is marked as a single character (e.g., "type_A") and ID containing 3 characters (e.g. ID_001), will be added.
How to exclude certain files by mask
You can exclude certain types of files from being added to the program's list. For example, you have BAK, EMF, WMF, CFG, and XML files in the source folder or archive, but they are not wanted in the List of Documents. To rule them out, go to the Advanced settings and find Exclude files by mask feature. Then add required file extensions you wish to exclude from processing:
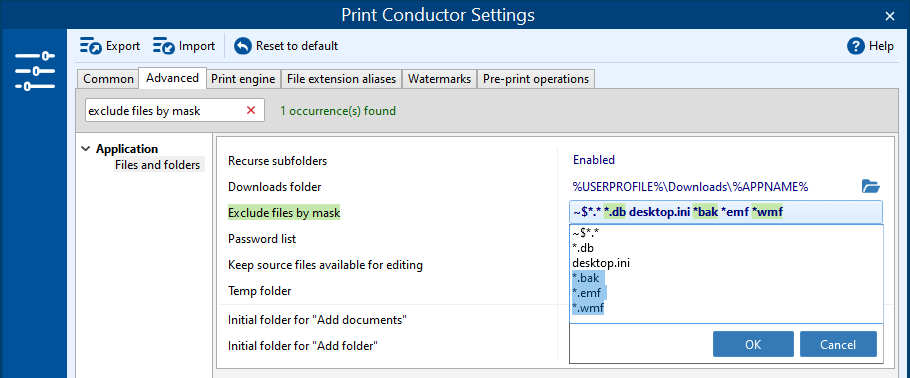
You can add any file extension this way. File extensions should be added like so:
*.[file extension]
Add documents from a ZIP, RAR, or 7ZIP archive
You can also add documents from an archive without extracting them beforehand. Just drag a ZIP file (or another type of archive) and drop it onto the Print Conductor main window. All files in this archive will be automatically added to the list.

Import a list of files from a TXT file
You can also import a list if you already have file paths listed (e.g., a list of file destinations created by another software). On the main window, click the Import List button to import it into Print Conductor.

The TXT file must contain full file paths (with or without double quotation marks), each on a separate line.
Using wildcards in a TXT file list
When importing a list of files from a text file, it is possible to use commonly used system wildcard characters. For example:
- Asterisk (star, *). The asterisk is the wildcard character which stands for any string of characters (including no characters at all).
- Question mark (?). The question mark matches one single character. It stands for any random character.

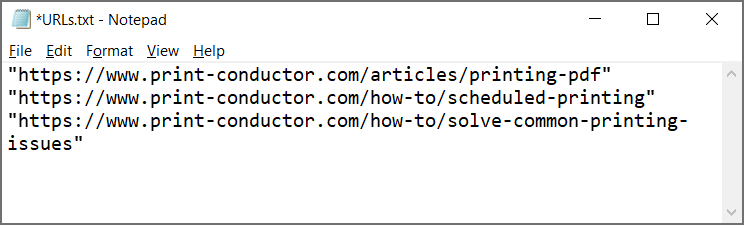
Importing a list of web pages (URLs)
If you have URLs of web pages that you want to print, simply save them as a plain TXT or Excel file (each web address on a separate line). Then, load the file list to Print Conductor using the Import List button. The web pages will be automatically converted to HTML and ready for printing.
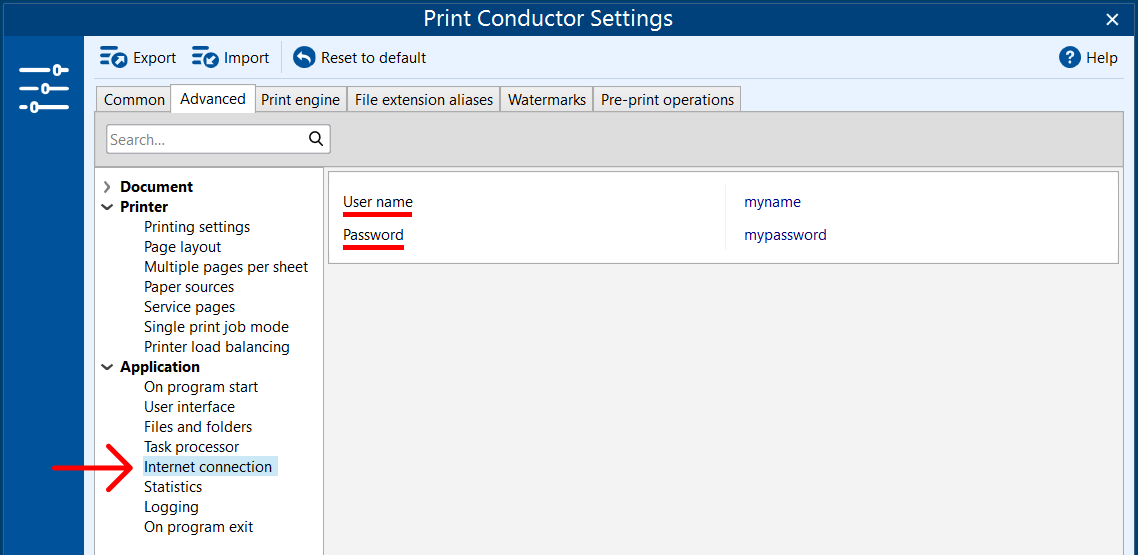
Login credentials may be required
If a website requires login credentials, specify them in Print Conductor's Advanced Settings to allow the program to access the webpage contents. Enter your credentials by navigating to Settings → Advanced → Application → Internet connection → User name, Password.
Did you know?
Using only Notepad, you can easily select files and create a TXT with their names and destinations. Each file path will appear on a separate line (see the screenshot below). Here's a step-by-step instruction:
- Open a folder and select all files by pressing Ctrl + A on your keyboard;
- While holding Shift, right-click the files and select Copy as path;
- Now all file paths are saved in the clipboard and can be pasted into Notepad;
- Create a new TXT file in Notepad;
- Paste the file paths into Notepad using Ctrl + V;
- Save the resultant TXT file.

If you have any difficulty creating a text file listing of the folder contents, check out our video How to get a list of files in a folder and print them.
Then you can simply import this TXT file to Print Conductor using the Import List button.
Import a list of documents from an Excel file (XLS, XLSX, CSV)
If you have Microsoft Excel installed, you can upload a list of document file paths contained within an XLS, XLSX, or CSV file. This requires a basic spreadsheet with file paths. The header of the first column should be labeled as #file. Add full file paths to this column and make sure the paths are valid.
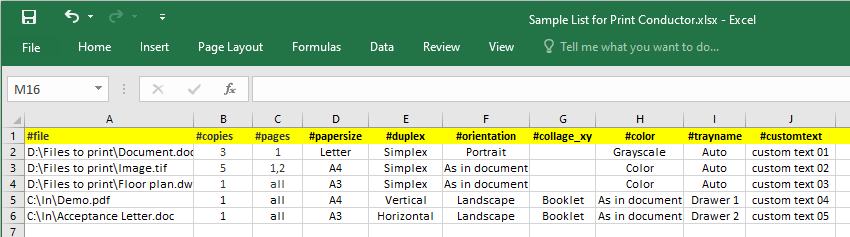
#file is a must, and it should include a full path to the file. The remaining columns are optional. Some cells can be left empty if you do not need to set a specific value.
Adding optional print parameters for each file
You can add optional parameters for each file. To do it, add the following columns with headings:
- #copies – set the number of copies to be printed. For example: 3
- #pages – set the page range, e.g., 1,3,10-25 or all
- #papersize – set paper format, e.g., Letter
- #duplex – set duplex mode: Horizontal (long-edge binding), Vertical (short-edge binding), As in printer, Simplex
- #orientation – set page orientation: Portrait, Landscape, As in document, As in printer
- #collage_xy – set value for Multiple pages per sheet mode where X stands for x-axis, Y stands for y-axis. For example: 2x1, 1x2, Booklet
- #color – set color mode: Color, Grayscale, As in printer, As in document
- #trayname – select a printer tray (see instructions on Printer info… below)
- #customtext – enter user-specified text for custom sorting or advanced watermarking
After adding all the necessary files to Print Conductor's List of Documents, you can double-check that the optional print parameters have been successfully applied in the main window of Print Conductor.

Checking available paper sizes and printer trays
To check available paper sizes and tray names for the current printer, click the Print Conductor logo and select Printer info...

Once you have added all necessary files to Print Conductor's List of Documents, you can click Start Printing.
 How to show Custom text columns in Print Conductor
To view the Custom text, Custom text 1, Custom text 2, etc. columns in the Print Conductor interface:
- Right-click the white space on Print Conductor List of Documents window → Show/hide columns → Custom text columns;
- Click on Custom text to enable it;
- Select Add new, it will be named "Custom text 1". Click again to add Custom text 2, etc.


By the way…
You can save a current list with custom settings that you applied for future use by clicking the Export list button.

This way, your list of documents will be saved as a FLIST file with all the settings and file order that you've set.
Load a list from Print Conductor's FLIST file
When you have a saved list that was previously exported from the program's interface, you can load it anytime you need to print the documents. Simply double-click the FLIST file or do it by clicking the Import button.

Setting the printer to be selected automatically when importing FLIST file
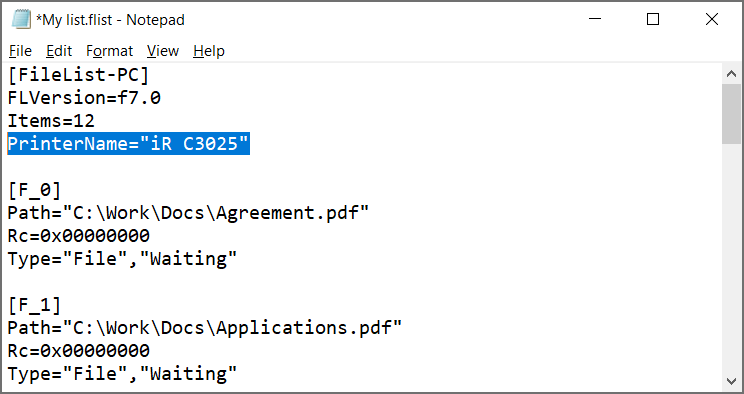
If you have your List of Documents as a FLIST or TXT file, you can edit it using a text editor such as Notepad (right-click the file, click Open with… and select Notepad).
This way, you can insert the printer's name in that FLIST file – just add a line PrinterName="[printer name]" in the beginning of the file, on a separate line (see screenshot below). As a result, the desired printer will be selected automatically when this FLIST file is loaded in Print Conductor.
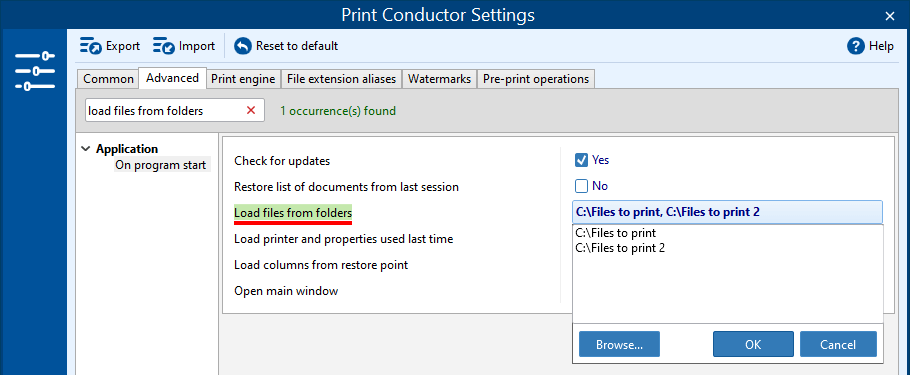
Load files from selected folders at program start
Suppose you have all the necessary files for printing located in a folder (or several folders). In that case, you can get them instantly added to the program. Print Conductor will automatically scan them and import all files into the List of Documents when the program starts.
To use this feature, find Load files from folders in the Advanced Settings and specify a path to one or more folders:
How to add files that have a non-standard file extension
If you have files in supported format but with a non-standard file extension, Print Conductor won't let you import these files. Still, there is a way to add and print them.
As an example, your software generates [filename].invoice files, which are structurally PDF. Print Conductor does not process files with ".invoice" extension. However, with the help of the File extension aliases tab, it is possible to import and print them – just associate your .invoice files with PDF format. Then your files will be processed the same way as PDF, which is one of the supported file types.
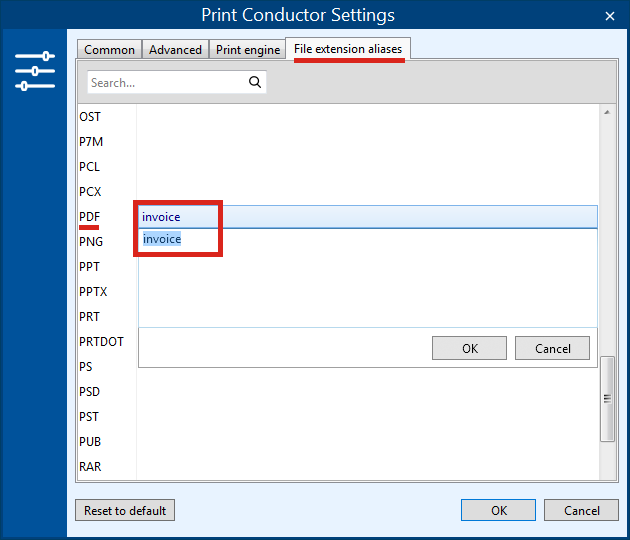
To process files with custom extension:
- Open the File extension aliases tab in the Settings;
- Place a cursor next to a file type you want to associate your files with;
- Enter your custom file extension;
- (optional) input several file extensions (type a new one after pressing Enter).
This way, you will be able to add your files without any extra effort. If you are not sure whether Print Conductor can or cannot process your specific files, please contact us.
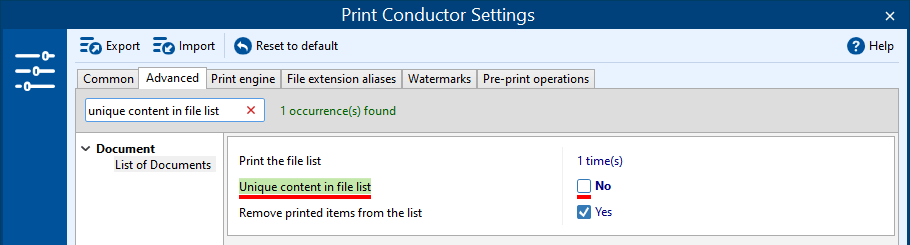
Add the same files to the List more than once (Unique content in file list)
Print Conductor doesn't let you add the same file to the List of Documents more than once with the Unique content in file list setting enabled by default. It helps you avoid a situation when a document is added to the list and printed several times by mistake.
To add the same file to the List of Documents more than once, switch off this option by unchecking the Unique content in file list option:
Disabling this setting can help if you want to print the same document several times. You may need to print a complex set of documents in a specific order in which one or more documents are included in the list twice or several times, for example, like so:
- Document A
- Document B
- Document C
- Document A
- Document D
- Document E
Turning off this setting can also help you print the same document with different print settings. Just add the same document as many times as needed and apply individual settings to each item using Item settings… from the contextual menu.
Note
If this was a one-time task, we recommend reverting Unique content in file list to the default setting (checked). You can do it by checking the box next to this setting again or clicking the Reset to default button.
To allow adding the same file more than once:
- Go to Settings > Advanced;
- Find the Unique content in file list setting (start typing "unique" in the search bar) and uncheck it;
- Click OK;
- Add files to the List of Documents;
- (optional) Apply individual settings to list items;
- Click OK.
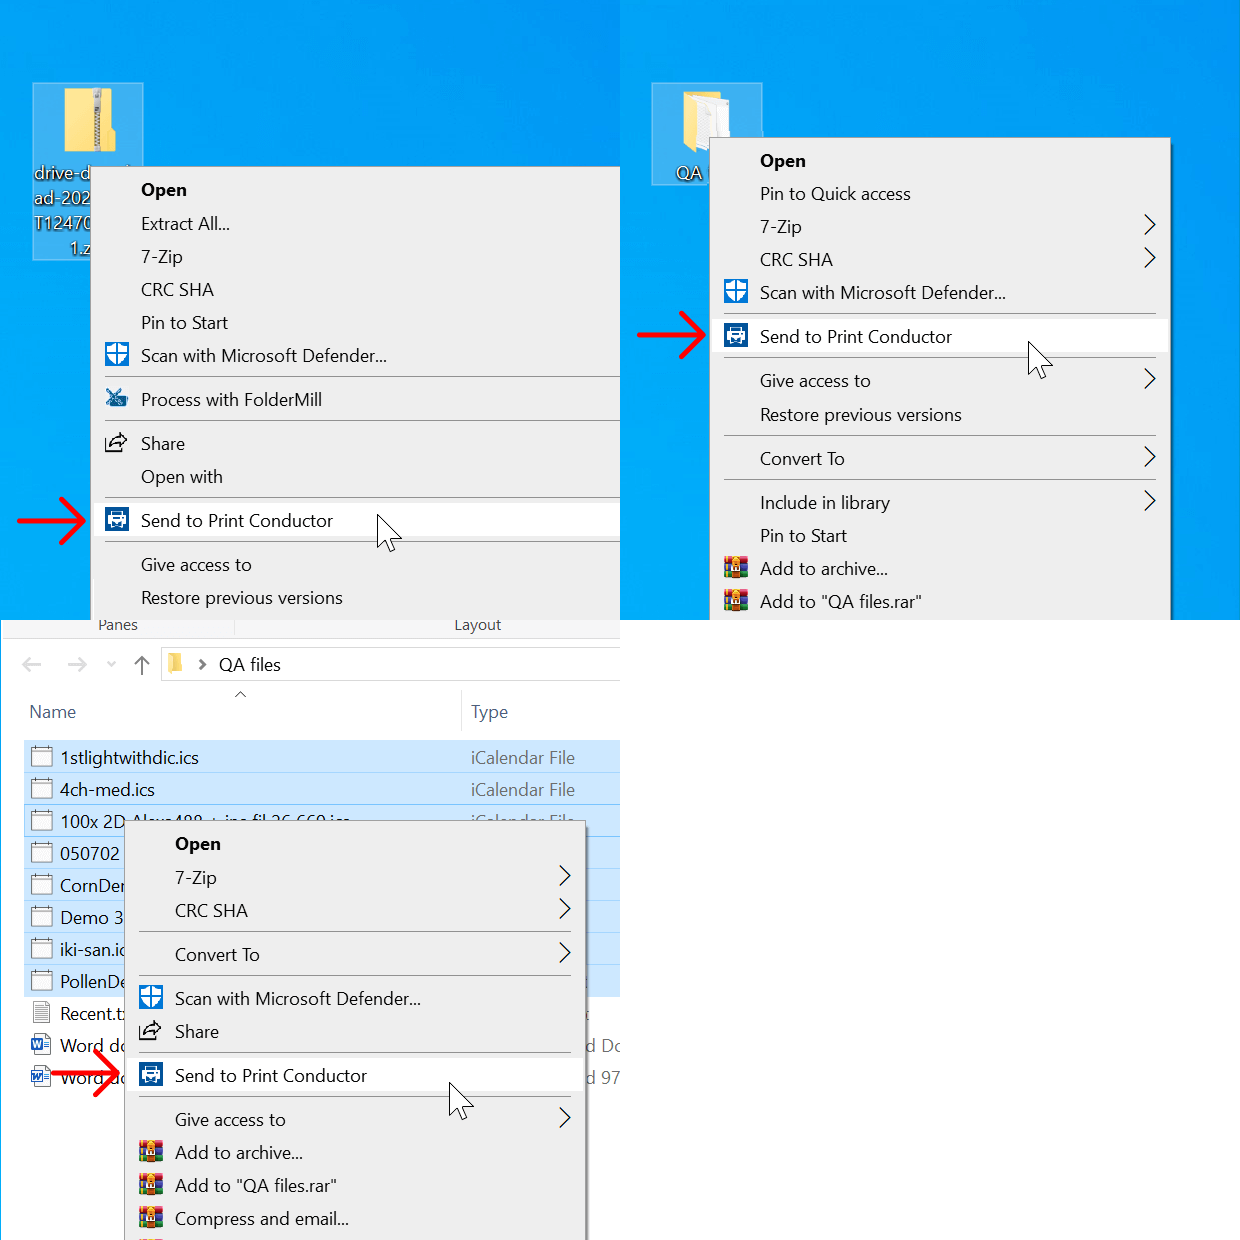
Quickly send files to Print Conductor using the right mouse click (Add to Windows Explorer context menu)
Print Conductor offers a convenient feature that allows you to easily add selected files to the program with just a few clicks. You can simply select a group of files in your Windows system, right-click them, and choose Send to Print Conductor. The files will be instantly added to the List of Documents. This can be done with:
- one or several files
- a folder
- an archive (ZIP, RAR, 7ZIP)
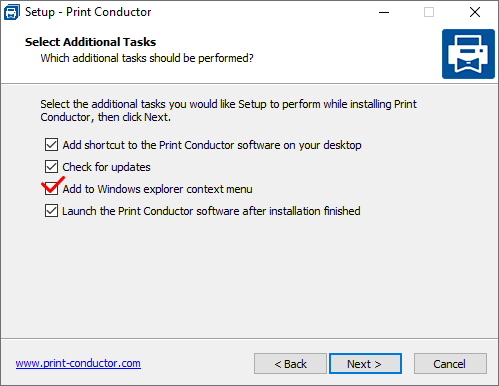
Please note that this feature is activated during the installation of Print Conductor. Make sure to have the Add to Windows Explorer context menu option enabled on this installation wizard's dialog screen:
Now that you know how to add files and create lists in Print Conductor, you can easily print the same documents again without any effort.
See also:
How To
Get other useful guides on using Print Conductor and see many other useful how-tos, solutions, tips & tricks on effective batch printing. You'll find out how to import & export files, manage print lists, configure document and page settings, set up service pages, and so much more.