This article outlines how to arrange several pages of a multipage document (or multiple documents) on a single sheet of paper for further batch printing.
Print Conductor is not only a robust batch printing software but also capable of rearranging the layout of PDF and other documents to print multiple pages per sheet. This method, also known as N-up printing, enables a compact arrangement of data and using less paper. You can determine the number of pages and their placement, both horizontally across the page and in vertical columns.
Multiple pages per sheet mode
Print Conductor allows you to print multiple pages from all files in the List of Documents on a single sheet of paper. Pages are arranged continuously across all added files rather than per file — for example, 20 single-page files printed in a 2×2 layout will produce 5 sheets with 4 pages each.
To activate Multiple pages per sheet mode:
- Select a printer that you want to use on the program's main window;
- Add your document(s) into the List of Documents;
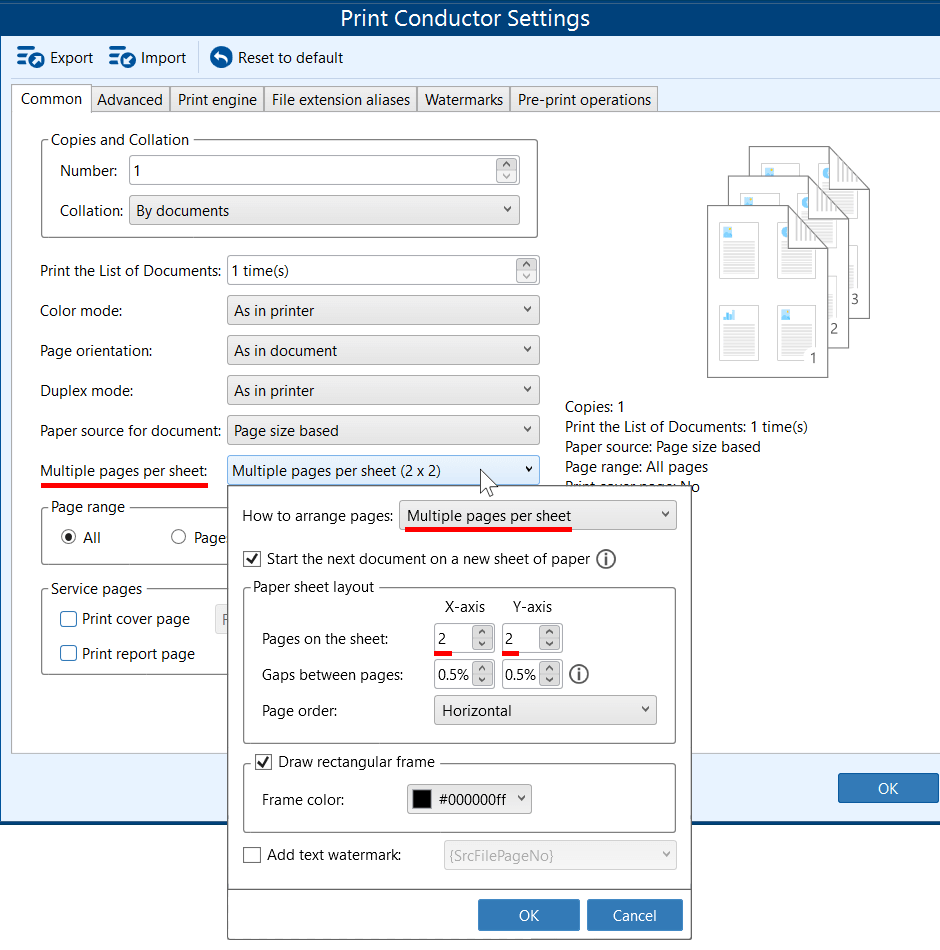
- Go to Settings → Common;
- Find section Multiple pages per sheet;
- Select the Multiple pages per sheet option next to How to arrange pages;
- Adjust the number of pages per sheet next to the option Pages on the sheet. The X-axis determines the number of pages horizontally, while the Y-axis determines the number vertically.
Optional parameters include:
- Starting the next document on a new sheet. Leave this checked to start every file on a fresh page, or uncheck it to use the remaining empty space on the current sheet to seamlessly start printing the next document.
- Setting Gaps between pages. Define the horizontal and vertical gaps between arranged pages. These gaps are set as a percentage of the sheet's longer side.
- Defining Page order. You can choose the exact sequence in which pages are arranged on the sheet. Depending on your preference, you can set the flow to Horizontal (left-to-right), Horizontal Reversed (right-to-left), Vertical (top-to-bottom), or Vertical Reversed (top-to-bottom starting from the right column)

Horizontal
Horizontal Reversed
Vertical
Vertical Reversed
- Drawing a rectangular frame. You can add a frame around each arranged page and choose any color for it.


Examples
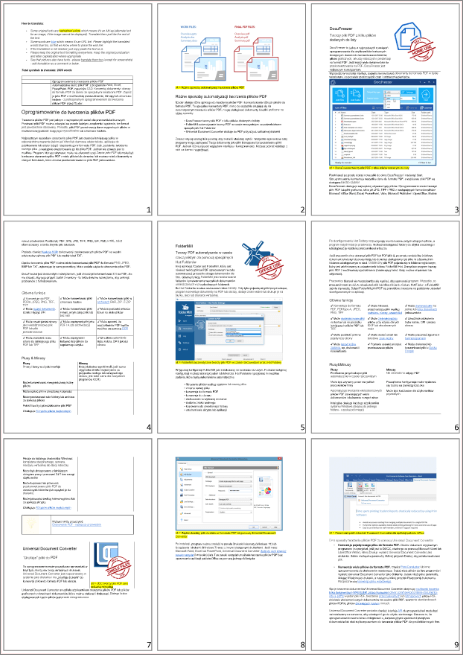
Below is the resultant 9-page Microsoft Word document (with added page numbers) as an example:
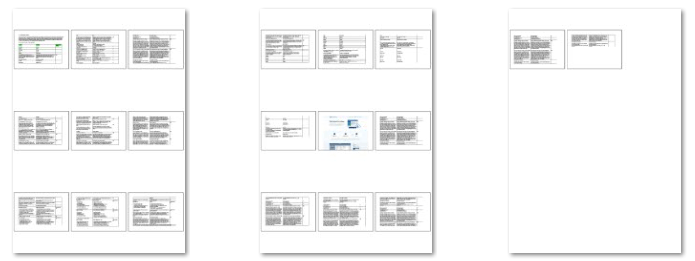
If you have a document containing 20 pages and want to arrange pages 3 x 3 (three pages vertically and three pages horizontally per sheet), you'll get 18 pages printed on two sheets and 2 pages left on the third sheet of paper:
This way, you can accommodate as many pages tiled together as needed, like a collage.
Note: If you don't need to have all the document's pages printed, just set a specific page range (e.g., 1-9).
How to print several documents on the same paper sheet
Let's assume you've added a few one-page documents to the List of Documents and set the 4 x 4 multiple pages per sheet mode configuration to start printing. By default, you'll end up with four paper sheets, each with a small print of a document in the top left corner. This may not be what you had intended.
That happened because Print Conductor starts each new document on a fresh sheet of paper by default.
If you want to print several documents on the same paper sheet, disable the Start the next document on a new sheet of paper option. This will arrange multiple files on a single sheet and print them in a compact way.
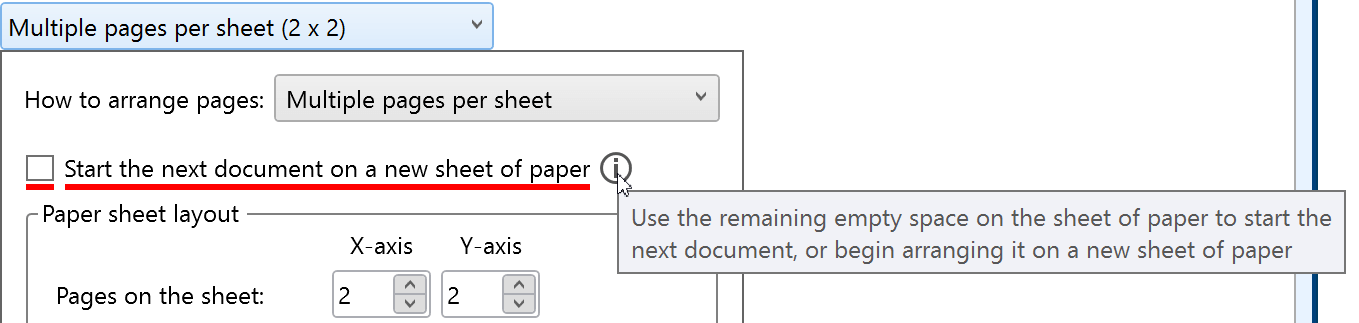
How does the option Start the next document on a new sheet of paper work?
When enabled ☑
Once the arrangement of pages is complete, the remaining empty space is left untouched, and the next document starts on a new sheet of paper. This is a good option for printing one or multiple multi-page documents.
When disabled ☐
Once the arrangement of pages is complete, the next document begins immediately, utilizing the remaining empty space on the sheet. This is an efficient option for printing many one-page files on the same sheet of paper.
How to print two pages on one sheet
Need to print two pages on one sheet of paper? If you need to arrange just two pages per sheet, Print Conductor can easily accomplish this. However, take into account the page orientation – landscape or portrait.
For portrait pages
If your document pages are in portrait orientation, it is advisable to place them horizontally on the sheet of paper. To do it, set:
- X-axis: 2
- Y-axis: 1
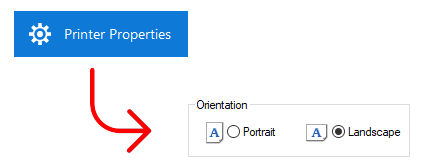
At the same time, make sure that your printer is set to printing using the landscape orientation. You can do it by checking the Printer Properties or changing page orientation directly in Print Conductor.
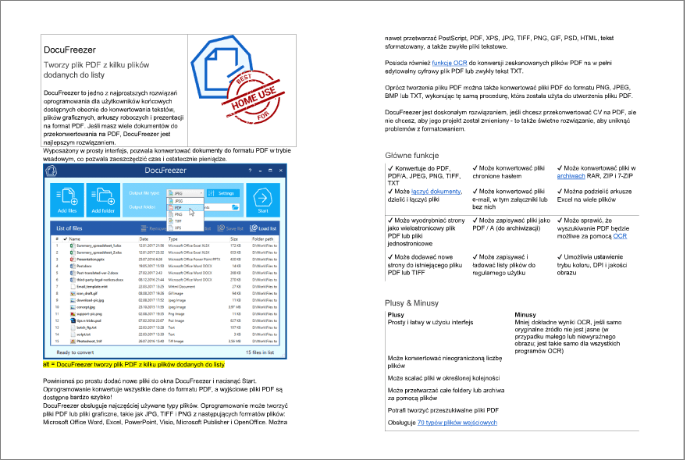
As a result, you'll have two pages fitting a sheet of paper and placed horizontally. The layout will look like this:
For landscape pages
If your document pages have a landscape orientation, arrange them vice versa: two pages vertically, one below another. To do it, set:
- X-axis: 1
- Y-axis: 2
In this case, also check that your printer is now set to printing in portrait orientation. You can do it by checking the Printer Properties → Orientation → Portrait or changing page orientation directly in Print Conductor.
This way, you'll get 2 pages on a sheet positioned one below another, which is, for example, a great way to print out Microsoft PowerPoint PPTX presentations. The printouts will look like this:
By the way…
If, as a result, your collage-like printout has poor image quality, try turning on the Print as image feature. This way, processing may be slower, but the rendering quality will be better.
Drawing a rectangular frame around each page
By default, Print Conductor adds a border around every page when Multiple pages per sheet is on. You can change Frame color or disable this feature by unchecking the box next to it.
Adding text watermark to pages
In multiple-pages-per-sheet mode, you can also enable adding a text watermark. By default, it is set to {SrcFilePageNo} – a page number that is applied to every page.
If you want to set a custom text watermark instead of page numbers on every arranged page, modify Text watermark settings. These settings have the same parameters as a regular Text watermark.
Please note that watermarks are applied to individual pages (not to the entire sheet of paper).
Booklet printing mode
With Print Conductor, you can take advantage of the Booklet printing mode. This mode places two pages on each sheet and prints on both sides of the paper in a specific sequence, creating a booklet. After folding and stapling the printed sheets, you'll have a brochure or a saddle-stitched booklet.

To enable Booklet printing mode, follow the same steps as described for the Multiple pages per sheet mode, but now choose the Booklet printing option.
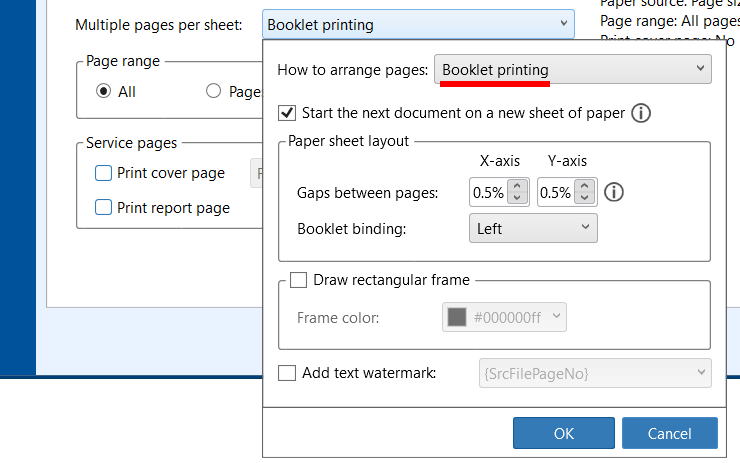
Optional parameters include:
- Setting Gaps between pages. Define the horizontal and vertical gaps between arranged pages. These gaps are set as a percentage of the sheet's longer side.
- Booklet binding. You can choose between Left and Right. Left binding (default option) is the most common binding for books and booklets.
- Adding a text watermark. You can add a text watermark to each page. By default, it is the source file page number ({SrcFilePageNo}), but you can customize it according to your needs.
When using this mode, consider whether you want to disable the Start next document on a new sheet of paper option, and check that the page orientation is correct (Portrait or Landscape).
See also
How To
Get other useful guides on using Print Conductor and see many other useful how-tos, solutions, tips & tricks on effective batch printing. You'll find out how to import & export files, manage print lists, configure document and page settings, set up service pages, and so much more.