Learn how to set up the way your documents will be printed in Print Conductor. You can easily arrange, sort, move files in the List of Documents and change print settings for certain files.
- Using the context menu...
- Change file order in the List of Documents
- Save & load columns' configuration using restore points
- Ensure printing in the correct order
- Change print settings for each file individually
- Add a time delay between printing each document
- Quickly find files in the List of Documents (Ctrl + F)
- View history of actions made to your List of Documents (Ctrl + H)
- Enable Print Preview for selected items in the List (Show preview pane)
- Export List of Documents with current print settings
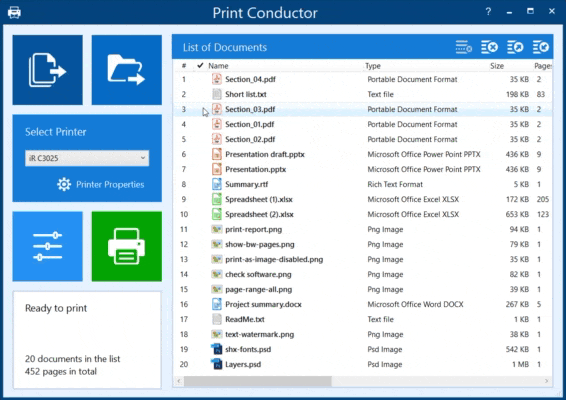
After the necessary files are loaded into Print Conductor, you will see your files on the Print Conductor main window – the List of Documents.

Now you can…
Click the green Start Printing button right away, and all files will be printed with optimal default settings. But before that, you can do many other useful things from the context menu! To access this menu, right-click any list item or anywhere in the white space.

Open file preview
Right-click an item in the list and click Open.

Print individual files only
Select only one file and instantly print it. Right-click an item in the list and select Print.

Change individual settings for each file
Select one or several items and click Item settings... in order to apply different settings to one or a group of files. Learn more →

Remove files
Instead of clearing the whole list, you can right-click and either Remove selected items from the list or Remove printed items from the list. Also, you can select one item, then press & hold Shift (or Ctrl) to select multiple items at a time. Once selected, press Delete to remove them from the List.
Clear list
Click the Clear list button to wipe out the current List completely and make a fresh start.
Reset item statuses
Use this button to clear all item statuses in the List of Documents (e.g., "done" or "paused").

Insert pause
Add a pause between list items, so that the printing session will be put on hold somewhere in the middle after printing a certain document. Then you'll need to click the Continue printing button to resume.

Show/hide columns
Display or hide certain columns of the List. There are 14 columns in total which can be switched on or off.

Open file location
Right-click an item in the list and click Open containing folder...
Also, you can add more files to the List. Before starting a print session or saving the current List, you can adjust the file order and apply print settings to individual files.
How to change file order in the List of Documents
You can make sure that the files are arranged correctly before printing. There are different ways to change file order:
1. Sort files in the List using column headers
By default, the order of files will be the same in which you added them to the List. You can change it by sorting the files according to one of the specific parameters. These parameters are controlled by columns at the top of the List.

It is possible to sort a list by a file-related or print-related column:
File-related columns
- Name
- Date
- Type
- Size
- Folder path
- Pages
- E-mail delivery time
Print-related columns
- Copies
- Page range
- Paper source
- Paper size
- Duplex
- Orientation
- Color
To sort files by a certain parameter, click the corresponding column header, e.g., Name.
If you click the column header Name, the files will go alphabetically – from A to Z. Click it again, and they will go vice versa – from Z to A. Similarly, you can click other column headers such as Date, Size, Copies, Page range, Pages .
Sorting files in the List by multiple columns at once
You can also apply sorting using multiple columns. To do so, right-click a column header and choose Sort ascending (A-Z) or Sort descending (Z-A). Then, do the same with another column header. You can apply sorting to as many columns as needed. To discard multiple column sorting, click Unsorted.
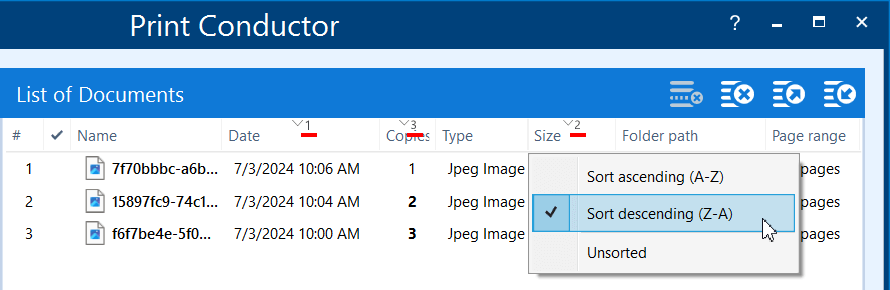
For example, you can sort by Date, Size, and number of Copies at the same time. Small numbers indicating the priority for each selected column will appear on the column headers.
Sorting files by Custom text column
Custom text is used to sort list items by any user-specified parameter. That means, you can select a group of files or a single file and enter any text in the Custom text field. Then, right-click anywhere in the List of Documents and enable a separate column called Custom text (Show/hide columns → Custom text). Now you can sort list items by your own parameter: click the column header, click & hold to drag the selected items, etc. – just like you would use any other column. You can create as many Custom text columns as needed and rename them as you like.
Sorting files by Custom info column
Another type of optional columns that can be added is Custom info column. It allows you to retrieve information from the document itself through macros. Available macros here are:
- {Printed} – Was the document printed or not?
- {LastPrintTime} – When did printing happen?
Just like with Custom text, you can create multiple Custom info columns and rename their headers by right-clicking them and clicking Edit custom info…

By the way…
If you cannot see specific columns in the Print Conductor interface, right-click anywhere on the List of Documents and check the Show/hide columns menu. You can also swap displayed columns – just click and hold a column header and drag it left or right.
2. Move groups of files up & down manually
You can select individual items in the List of Documents and move them up or down. You can do it in different ways:
- Press Ctrl and click the desired files one by one;
- Click one file, then press Shift; while holding Shift, click another file.
After that, click & hold to drag the selected items up or down.

3. Reverse the order of files in the List of Documents
You can reverse the order of items in the List of Documents with a single mouse click. To switch the order of items to reverse, click the # column header.
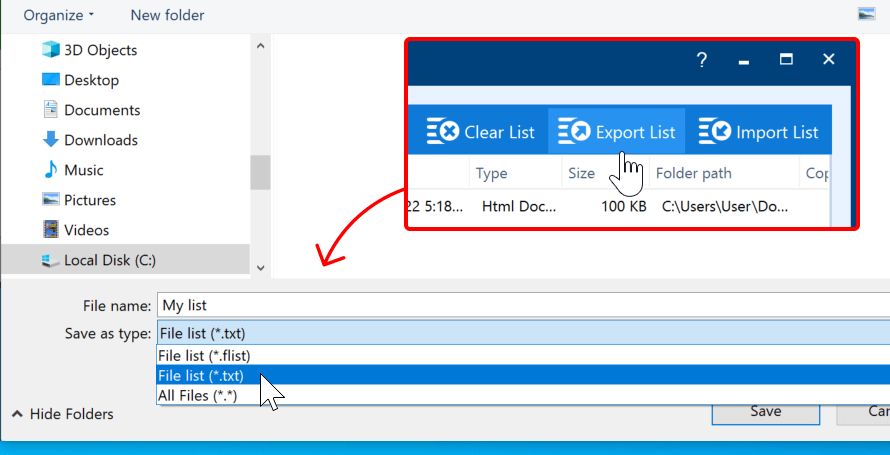
4. Export, change order, import
If your List of Documents is very large, it may become very hard to move items up or down in order to change the order of files. If that's the case, you can add the files, then export their paths as a File list (*.txt), and rearrange the files as needed inside a plain text file using NotePad or another text editor. Finally, import the resultant TXT file into Print Conductor, and you're good to go.

To change file order using a plain text file:
- Add your files to the List of Documents;
- Click the Export List button in right-top corner of the Print Conductor's window and save list as File list (*.txt);
- Use Notepad or similar plain text editor to change order of files and save changes;
- Clear Print Conductor's List of Documents;
- Click the Import List button and load the previously saved TXT file.
How to save & load columns' configuration using restore points
By default, active columns and their position in the List of Documents are saved on program exit automatically. However, if you (or someone else) accidentally change your favorite configuration, you can recover it back with a few clicks. To restore your own columns' configuration from a restore point, use the Columns configuration management setting.
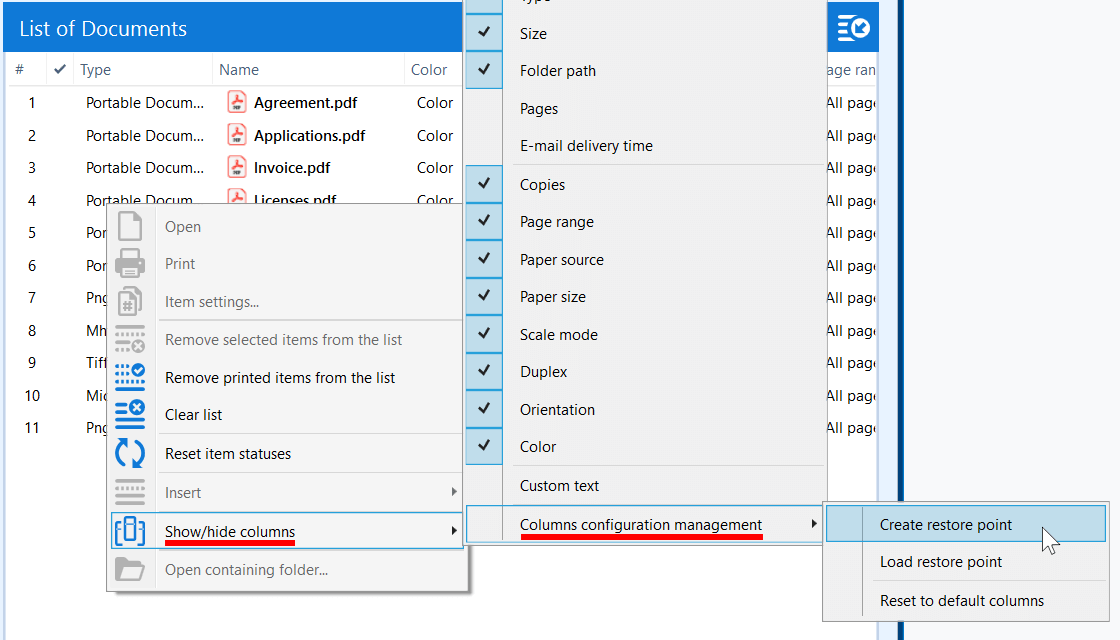
To create/load columns' configuration restore point:
- Change active columns, columns' position, or columns' width;
- Right-click anywhere in the white space on the List of Documents;
- Select Show/hide columns > Columns configuration management > Create restore point;
- When you want to restore saved configuration, use the Load restore point option.
How to ensure printing in the correct order
Print Conductor doesn't send files directly to the printer, but to the Windows print queue. That's why there's a small chance that your files might get mixed by the system.
To make sure that documents are printed precisely as you arranged them, use the Single print job mode in Print Conductor. This feature guarantees that all files will be printed in the order that you've set.
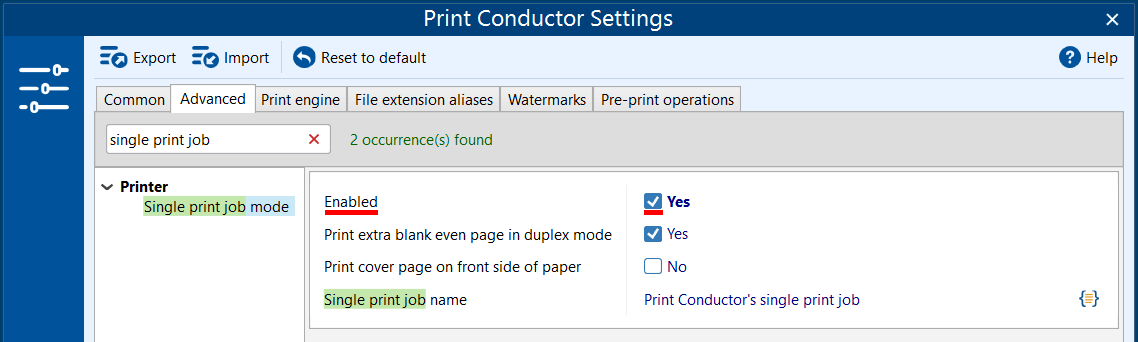
To enable printing as one job in Print Conductor:
- Open Settings;
- Go to Advanced tab;
- Find the Single print job section (start typing "Single" in the search bar) and check Enabled.
How to change print settings for each file individually
You can also apply individual settings to each file if necessary. To do it with a single file or a group of files, right-click a certain file (or a group of files) and select Item settings…
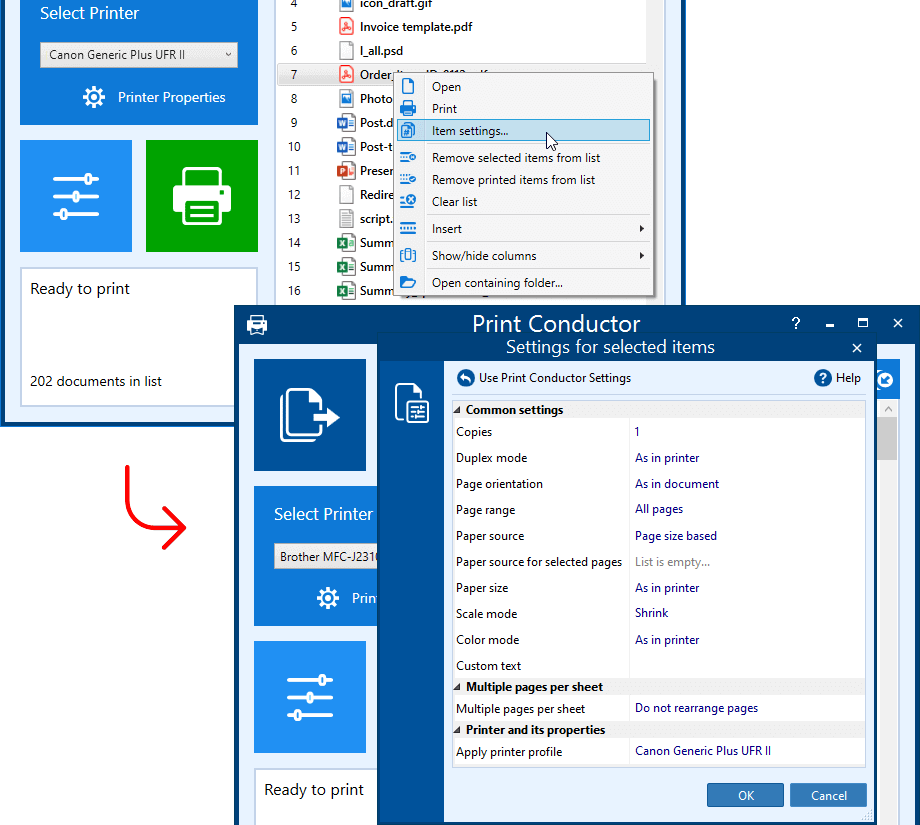
Individual item settings include:
- Copies
- Duplex mode
- Page orientation
- Page range
- Paper source
- Paper source for selected pages
- Paper size
- Scale mode
- Color mode
- Custom text
- Multiple pages per sheet
- Apply printer profile
Use individual file settings if you want to print certain files differently. Besides, they can also help if changing the printer driver's settings (via the Printer Properties button) doesn't take effect.
The Apply printer profile setting can also help you print different files to different printers. Learn more: How to Print Files on Different Printers
How to select several files and apply individual settings to them?
To select multiple files, use either of these methods:
- Click the first file, then press Shift. While pressing Shift, click the last file
- While pressing Ctrl, click each file you want to select
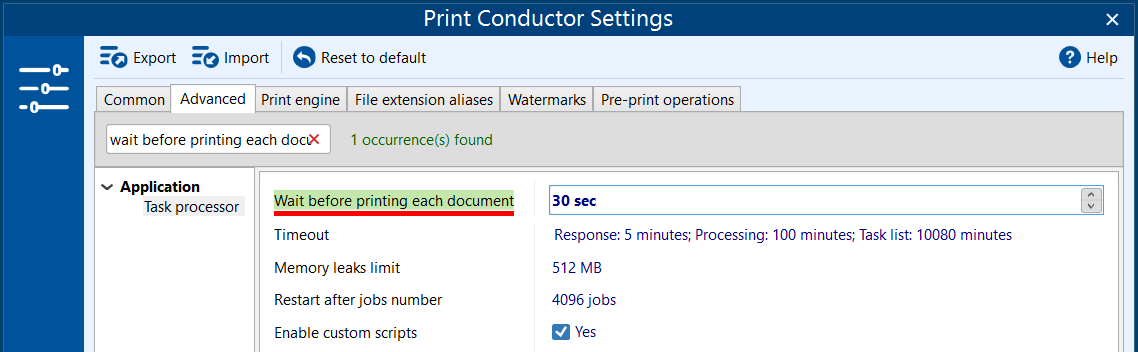
Add a time delay between printing each document
You can control how fast each item in the List of Documents is processed. By default, each new file gets printed instantly, with no delay. You can adjust the "wait" time before printing the next document in the List – using the Wait before printing each document option.
Quickly find files in the List of Documents (Ctrl + F)
Sometimes, it may be necessary to search for items within a List of Documents to remove them, change their position, adjust individual print settings, or perform other actions. To quickly find these items, you can use the Find files in the list feature.
")
To search for files by name:
- Press the Ctrl + F combination on your keyboard.
- Type the filename or a part of the filename of the file you want to find.
- If needed, modify the additional options Case sensitive and Use wildcards located under the arrow icon.
- Press Enter or click on Find next. You can press Enter multiple times to ensure you have found the correct item.
View history of actions made to your List of Documents (Ctrl + H)
If you work with different file lists (.FLIST) and frequently import various lists, it can be challenging to keep track of the currently loaded list since its name is not displayed. To address this issue, there is a feature called History. It displays the changes made to the List of Documents at the bottom of the main window of Print Conductor.
")
To view the List of Documents History:
- On the Print Conductor main window, press the Ctrl + H combination on your keyboard to show the History window.
- Make changes to the List of Documents, such as importing a previously saved list of files (FLIST), or adding/removing items from the current list.
- You will see these events being logged in the "History" window.
If you want to hide this window, press Ctrl + H again.
Enable Print Preview for selected items in the List (Show preview pane)
Sometimes it is helpful to view a Print Preview of items you added to the List before printing. To enable this, find the setting Show preview pane in the Advanced Settings and set it to Yes. After that, you can click on a file in the List of Documents, and its preview will appear on the right side of the Print Conductor window.

Tip: You can scale the preview pane up or down by dragging the border with your mouse.
Learn more about the Preview pane →
Export List of Documents with current print settings
Once you have added all desired files and configured your List of Documents, you can save your list. This way, you will be able to import it later using the Import button and reprint documents using the same settings again.

To save the resulting list with custom settings, click the Export List button. It will be saved as a FLIST file. You can quickly start Print Conductor and automatically load your saved List of Documents by double-clicking the FLIST file that you saved.
Saving a file list (.FLIST) containing relative file paths
In addition to absolute paths, you can use relative file paths.
Absolute file path
C:\Work\Images\drawing.pngRelative file path
..\..\..\Work\Images\drawing.pngUsing relative file paths is especially beneficial when your files are frequently moved to different locations, for example, from the "C" drive to the "D" drive.
To export a file list with relative file paths:
- When the Export file list dialog prompt appears, click the Options... button as shown below;

- Activate the Write relative file path checkbox and click OK;
- Enter the name for the list of files and click Save.

You can double-check the relative paths by opening the resulting FLIST file with Notepad. The paths will appear as follows:
Path="..\..\..\Work\Docs\ocr-langs.png"
Saving List of Documents as TXT
You can also export your List of Documents as a plain text file (TXT), for example, to change the order of files. Please note, however, that a TXT file (compared to FLIST file) will not save individual print settings if you applied them in the List of Documents (such as Color, Scale mode, etc.).
By the way...
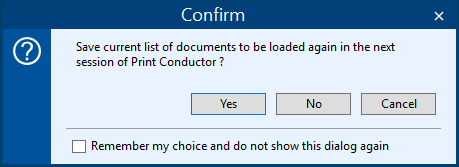
When a user closes Print Conductor, the program prompts a user to save the current list of files and load them again next time. This also can help if you regularly work with the same group of documents.
Did you know?
Besides saving and loading Lists of Documents, you can export and import current Print Conductor Settings.
See also:
How To
Get other useful guides on using Print Conductor and see many other useful how-tos, solutions, tips & tricks on effective batch printing. You'll find out how to import & export files, manage print lists, configure document and page settings, set up service pages, and so much more.