When working with Print Conductor, along with other file types, you can add various documents to the print list. You can make different settings for your documents. Documents usually consist of pages. In this article, we will look into the settings available for pages. They include page scaling, page numeration, printing crop marks, printing several pages on one sheet, page auto-rotation, alignment & offset, color mode, paper size, and more. You'll find these in Settings > Advanced: Page layout, and Multiple pages per sheet sections.
Select paper size
You can set specific page size for your printed documents. By default, it is set to As in printer – your selected printer controls the paper size. To find which paper size is currently set in your printer, check the Printer Properties:
![]()
To change paper size via Print Conductor, use the Paper size option:
 for documents")
The range of available page formats will depend on your printer model. If you want the program to select the most appropriate paper format for each file automatically, change the default setting As in printer to Page size based.
When Page size based is selected, Print Conductor identifies the page size dimensions of a document. It chooses the best paper format that would match the page at a scale of 1:1 without large margins around the page. If a perfect match is not possible, then the closest possible option is used.
To set paper size:
- Go to Settings > Advanced;
- Find the Paper size setting (start typing "paper size" in the search bar);
- Select the necessary option or paper format from the dropdown list;
- Click OK.
Change color mode
In the Advanced settings, you can set color or grayscale (black & white) printing.

- Grayscale (grayscale mode)
- Color (color mode)
- As in printer (as set in your Printer Properties)
If you have any additional color properties set in your printer properties (e.g., RGB or CMYK color mode selected) or a saved color profile, use As in printer option to keep these settings intact.
To select color mode:
- Go to Settings > Advanced;
- Find the Color mode setting (start typing "color" in the search bar) and change it;
- Click OK.
Set color mode for selected pages
If you want to set a color mode for certain pages or a page range only, you can change color mode (Color/Grayscale) for different pages or page ranges. For example, you can print the first page in color, and all other pages – in grayscale mode (black & white).
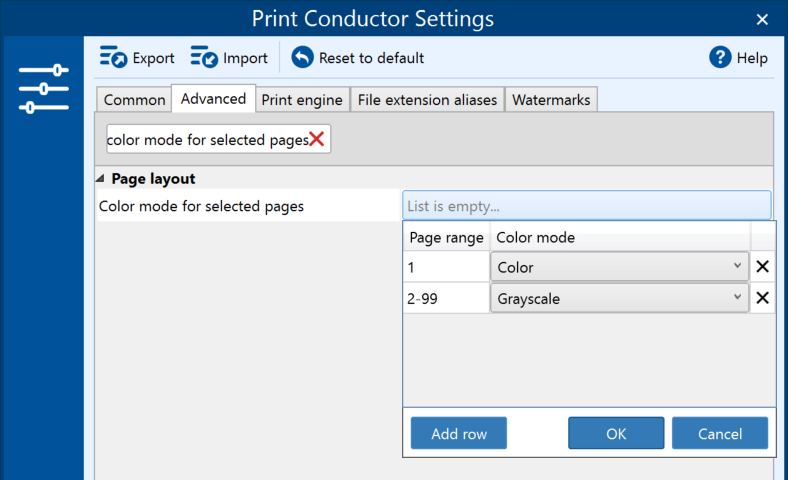
To set color mode for selected pages:
- Go to Settings > Advanced;
- Find the Color mode for selected pages setting (start typing "color mode" in the search bar);
- Configure the setting as needed;
- Click OK.
Set auto rotation of pages
Print Conductor has an ability to auto rotate pages automatically and align them to the sheet of paper. You can simply enable this setting and not worry about changing the page orientation – portrait or landscape – for each printed document or image.

To turn on auto rotation of pages, find the Auto rotate setting and enable it. Choose which way the pages should be rotated – Clockwise or Counterclockwise. The program will automatically detect the best page orientation for each document and rotate it to landscape or portrait.
To automate page rotation:
- Go to Settings > Advanced;
- Find the Auto rotate setting (type "auto" in the search bar) and check it;
- Click OK.
Set page orientation
You can manually set orientation of pages to portrait or landscape. Portrait and landscape refer to different orientations of the paper – whether it should be printed vertically or horizontally.

Available options are:
- Portrait (set vertical orientation)
- Landscape (set horizontal orientation)
- As in document (keep the same as the document's orientation)
- As in printer (keep page orientation as set in Printer Properties)
To change page orientation to landscape or portrait:
- Go to Settings > Advanced;
- Find the Page orientation setting (type "orientation" in the search bar);
- Select the desired option;
- Click OK.
Print as image
In Print as image mode, Print Conductor converts documents into a raster graphic (bitmap) image before printing. If you have any issues with print quality (e.g., text characters look corrupted, or the overall quality looks poor), try this feature.

To increase the printout quality:
- Go to Settings > Advanced;
- Find the Print as image setting (type "print as" in the search bar) and check it;
- Click OK.
Set rasterization resolution
You can control Rasterization resolution value (DPI, Dots Per Inch) which affects quality of files when they are rasterized before printing. This setting applies only when printing in Print as image mode. Resolution can be set in a range between 72 to 2400. We recommend:
- 300 DPI for text documents;
- 600 DPI or higher – for high-quality images or photos.
We don't recommend setting DPI lower than 150 (the printout may have low visual quality) or higher than 1200 (processing may take a lot of system resources and time).

To set DPI for printing:
- Go to Settings > Advanced;
- Find the Rasterization resolution setting (type "rasterization" in the search bar);
- Define the DPI value;
- Click OK.
Add crop marks
Crop marks (cut marks or trim marks) are thin lines printed in the corners of your document sheets of paper to show where to trim the paper. Print Conductor can add crop marks when printing images or PDF files. Find Print Crop Marks in the Advanced settings to use this feature:

To print crop marks:
- Go to Settings > Advanced;
- Find the Print crop marks setting (type "crop" in the search bar) and check it;
- Click OK.
Set page scaling
You can set page sizing to define how the printouts will look on the sheets of paper. Adjust it using the Scale mode feature:

Available options are:
How to create borderless prints
If you want to print borderless prints but you're getting a border on the printed sheet of paper, try either of two configurations below.
For smaller borders
Change Scale mode to Fill.
For no borders
Set Scale mode: Fill and Paper size: As in printer.

Please note that results may vary depending on your printer model. For borderless printing, you may also need to check your print driver settings related to page scaling by clicking the Printer Properties button.
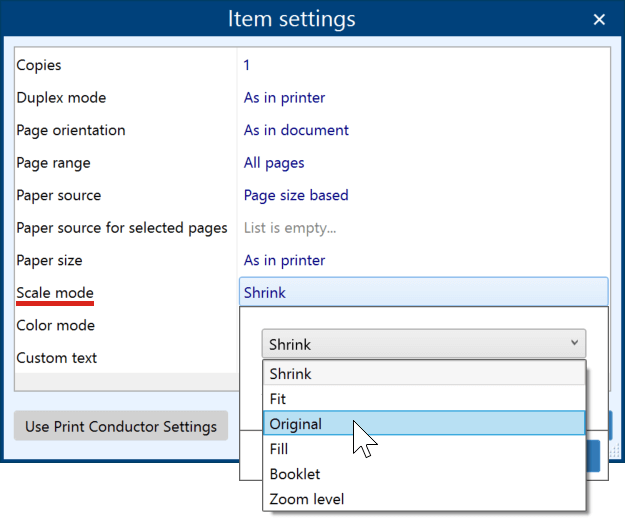
How to change page scaling for individual files only
If you want to change page scaling only for specific files in the List of Documents, you can do it, too. Right-click any added file, select Item settings… and use the Scale mode setting.
How to set custom page zoom
With Zoom level, you can set any percent of pages' original size. This setting allows you to fine-tune the scaling of each page, even if pages in a document have different size.
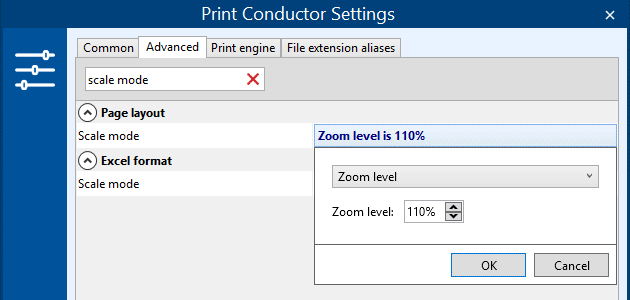
The Zoom level option is available for HTML and Excel files too. You'll also find it in these sections of Advanced Settings:
- HTML format
- Excel format
To adjust page scaling:
- Go to Settings > Advanced;
- Find the Scale mode setting (start typing "scale" in the search bar) and change it;
- Click OK.
Adjust page alignment & offset
With Print Conductor, you can adjust and fine-tune the positioning of the print on a sheet of paper. It can be done via Alignment and Offset settings. You can use them as standalone settings (separately) or both together.
1. Alignment
By default, a printed page or image is centered. If you want to make it off-center, you can select an alignment option in the Advanced settings:

Adjust a page's position on the sheet of paper by changing one or both Horizontal alignment or Vertical alignment options using parameters:
- Center
- Right
- Left
- Top
- Bottom
2. Horizontal & vertical offset
This setting shifts the page position vertically and horizontally. By default, both options are set to 0, which is the origin of coordinates. Zero (0) is the starting point and is located in the top left corner of a page or image. You can change them to any value. Units equal to 0.01 inch. You can use both positive and negative values, for example:
- Horizontal offset: 150
- Vertical offset: -50

Note
If you specify high values for offset, your printouts may extend beyond the printable area or go beyond the bounds of a sheet of paper. To select the best offset values for your needs, we recommend trying virtual printing before the actual printing. You can do it by using Print Conductor with the Universal Document Converter virtual printer.
3. Alignment + offset
You can combine offset with page alignment. This is how it works: when alignment is set, e.g., to Center and Right, you can additionally shift the page or image relative to the starting point. Below is a scheme illustrating the starting points:

To adjust printout positioning on the sheet of paper:
- Go to Settings > Advanced;
- Find the Horizontal alignment and Vertical alignment values (start typing "align" in the search bar) and change them;
- Find the Horizontal offset and Vertical offset values (start typing "offset" in the search bar) and modify them;
- Click OK.
Change printer resolution
Most printers support high, medium, low, and draft resolutions, and you can set this directly in Print Conductor. These properties are handy when you want a quick version, or draft, of your documents for proofing, or a slower, but high-quality version for release. To do it, change the Print resolution in the Advanced tab:

- As in printer (as set in your Printer Properties)
- High (print at a high-quality level)
- Medium (print at a standard quality level)
- Low (print at a low-quality level)
- Draft (print low-quality draft output)
To change printer resolution settings:
- Go to Settings > Advanced;
- Find the Printer resolution setting (start typing "printer" in the search bar) and change it;
- Click OK.
Vectorize text
You can use the Vectorize text feature so that the program converts text characters into outlines (curves) before printing. This option may come in handy when you are printing to a vector PDF using a virtual printer. The output file will be readable, but the file recipient will not be able to copy or edit the text from it. So if you print to a PDF printer (like Universal Document Converter or Acrobat), you'll get a vectorized PDF but with non-searchable text.
To use this feature, enable Vectorize text setting in the Advanced tab:

Note
This feature works with PDF documents as source files and only if ABCPDF print engine is used. To select this print engine, go to Settings > Print engine and select ABCPDF next to PDF format:

To convert text into curves:
- Go to Settings > Advanced;
- Find the Vectorize text setting (start typing "vectorize" in the search bar) and check it;
- Click OK.
See also:
How To
Get other useful guides on using Print Conductor and see many other useful how-tos, solutions, tips & tricks on effective batch printing. You'll find out how to import & export files, manage print lists, configure document and page settings, set up service pages, and so much more.