Print Conductor allows you to add various types of watermarks to document pages when printing:
You can add a single watermark to all or selected document pages. Or use multiple watermarks at once. Learn more about each watermark type below.
- Text watermark
- Text watermark parameters
- Add page numbers
- Place custom watermark on page center
- Add filename to header or footer
- Set colored background
- Use item's index number as a text watermark
- Insert multi-line text watermark
- Add consecutive (continuous) page numbering using macro {ConsecutivePageNo})
- Add sequence numbers to PDF pages
- Add number of document's copies to each printed page
- Description of all Text watermark macros
- Image watermark
- Barcode watermark
- Applying watermarks to selected items only
- Enabling and disabling added watermarks
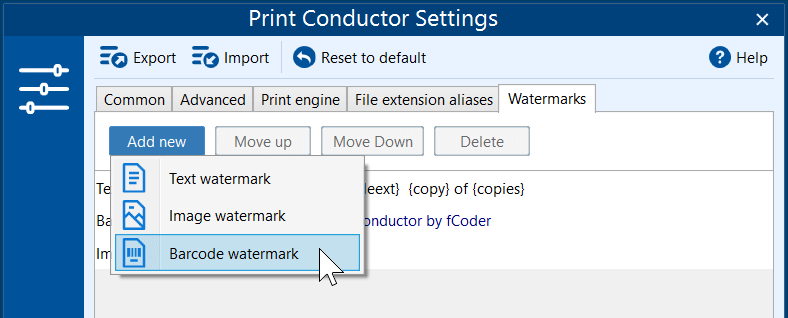
To add a new watermark, open Print Conductor Settings, switch to the Watermarks tab, click Add new and select the desired type of watermark.
Text watermark
Text watermark lets you add text to printed pages. You can create a text watermark using:
- Plain text
- Macros
- Plain text + macros
The program has built-in macros (use the Macro button) that allow you to add various data from original source files such as filename, page number, date/time, or copies.
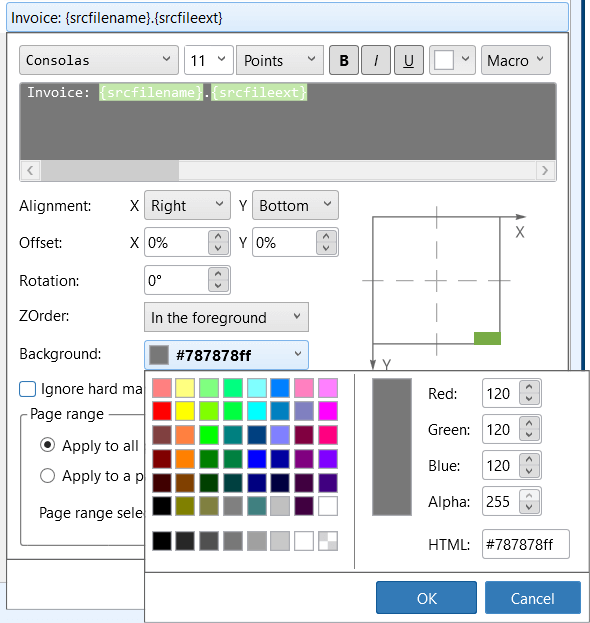
You can combine macros to create a complex text watermark. For example:
"Invoice: {srcfilename}.{srcfileext}".
Most macros take data from the source file metadata. If some data is missing in the file – the macro will be omitted.
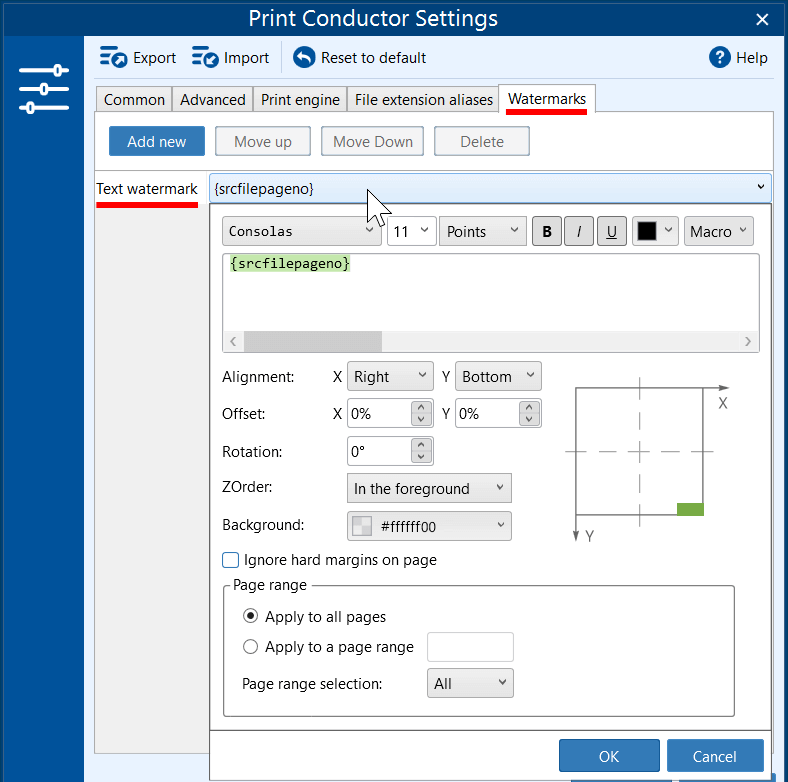
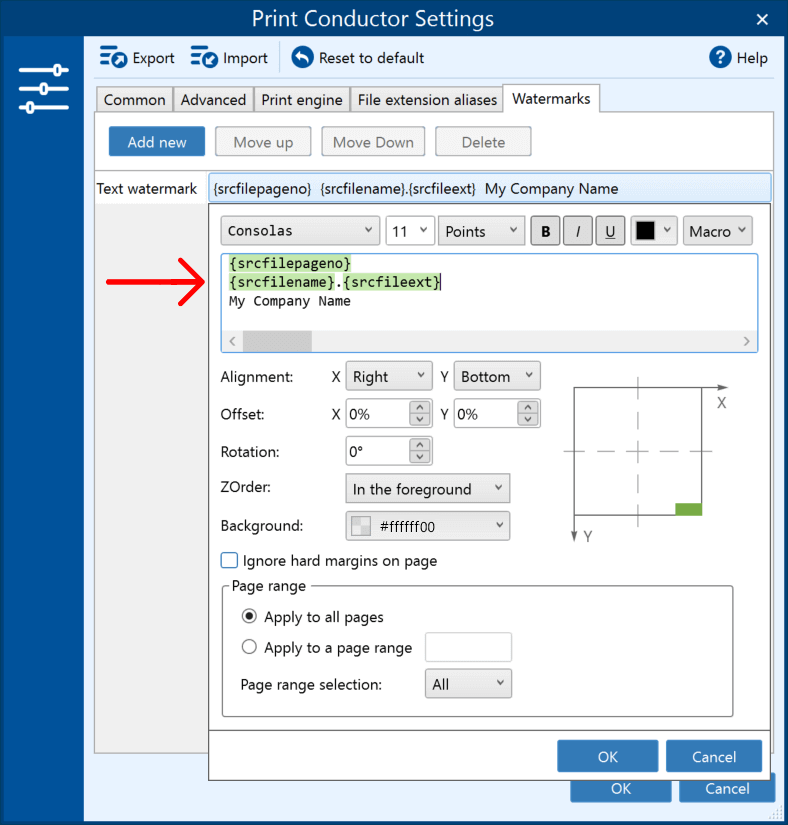
Text watermark parameters
You can customize watermarks your way – adjust font, offset, margins, background, rotation, and more. These are available parameters:
| Setting or interface element | Functionality |
|---|---|
| Font | Set stylistic attributes of a font: font type, color, size |
| Watermark text | Type any text or use macros. {srcfilepageno}, set by default, stands for source file page number |
| Alignment | X-axis alignment: Left, Center, RightY-axis alignment: Top, Center, Bottom |
| Margins | X and Y-axis margins: set any value in points equal to 0.01 inch |
| Rotation | Adjust the angle of watermark rotation to a certain degree |
| Background | Select color behind the text |
| Z-Order | Set watermark Z-axis position: In the foreground or In the background |
| Ignore printable area of the page | Ignore the printable area limitations applied by default by some printers and instead use the dimensions of the paper sheet only |
| Page range | Select pages or page ranges for applying the watermark. To choose certain pages or a specific page range, type in the desired page numbers and/or ranges separated by commas. For example: 1,3,5-10,25. To select pages from the end of the document, use the syntax last (last1 for penultimate page, etc.). For example: last2,last1,last You can also select only odd or even pages via Page range selection. |
Add page numbers
You can automatically paginate documents. To add page numbers when printing PDF or other document types, use the default macro: {srcfilepageno}
Place custom watermark on page center
Using the Text watermark feature, you can insert not only page numbers but add any other text in the center of printed pages. To do it, set Alignment to Center; Center.
Add filename to header or footer
You can add your watermark in the bottom right corner – to place it, for example, in the footer. To do it, set Alignment to Right and Bottom. The green indicator on the preview panel will show the approximate position of the watermark.
Set colored background
You can change the background color of a watermark. The selected background color will fill a rectangle behind the text.
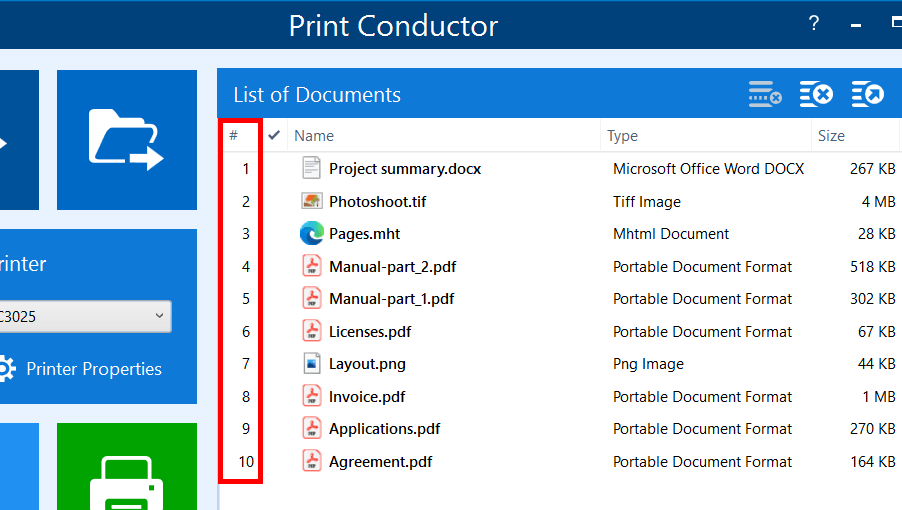
Use item's index number as a text watermark
With the macro Item # in list, you can add each item's index number (#) in the List of Documents as a watermark. This macro will add numbers, so you'll see the sequence of all documents after printing them.
Insert multi-line text watermark
You can create a complex watermark consisting of multiple lines (both plain text and macros can be used).
Add consecutive (continuous) page numbering using macro {ConsecutivePageNo})
The following feature is useful when you want to paginate every document considering the total number of pages across all documents added to the List of Documents for printing.
You can achieve this by using a custom watermark with specific macros. For consecutive (continuous) numbering, you may use this watermark:
{ConsecutivePageNo} of {TotalPages}
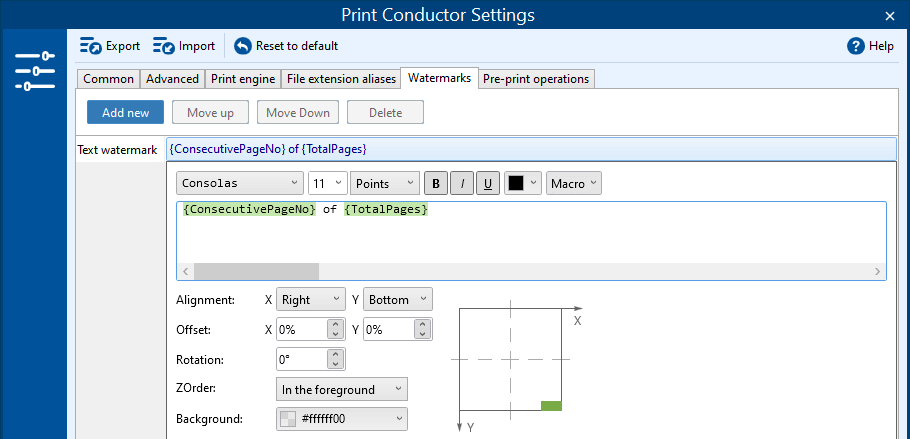
Print Conductor will count all pages of all documents in the List and add the corresponding page number to every page. For example: 6 of 10.
Learn more information about the macro {ConsecutivePageNo} →
Add sequence numbers to PDF pages
With some special macros, Text watermark can be used for special page numbering.
For example, we created a macro (by request) to enumerate sets of printed documents with 5 digits at the bottom of each page:
Set 1
Page 1 – 58001
Page 2 – 58001
Page 3 – 58001
Set 2
Page 1 – 58002
Page 2 – 58002
Page 3 – 58002
Set 3
Page 1 – 58003
Page 2 – 58003
Page 3 – 58003
The text watermark template is:
58{SetNo(D3)}
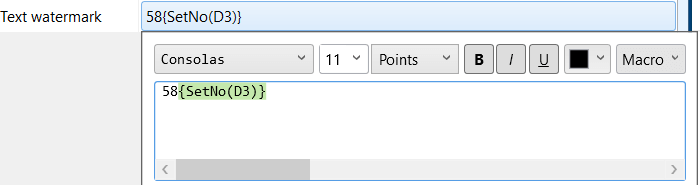
Such tasks may need additional development, so please contact us for a custom solution with your requirements.
Add number of document's copies to each printed page
The Text watermark feature allows you to add the current copy number to pages. For instance, if you want to display the current document's copy number at the bottom corner of each output page, use the {copy} macro. To indicate the total number of copies, use the {copies} macro. For a complex watermark, you could use the following watermark: {copy} out of {copies}. Learn more →
Description of all Text watermark macros
Macros are enclosed in curly brackets. Macros can have optional parameters enclosed in parentheses: name("par1","par2")
| Macro name/Group of macros | Macro | Description |
|---|---|---|
| Filename | ||
| Source file name | {srcfilename} | File name (without extension).Example: Document_A |
| Toggle case (switch between upper and lower) | {SrcFileName("upper")}, {SrcFileName("lower")} | Apply case conversion to change text to uppercase or lowercase using values "upper" or "lower". This can be applied to various macroses, for example: {SrcFileName("upper")} {SrcFileName("(.*?\'|(.*?)$","upper")} |
| Regular expression of source file name (subgroup) | {SrcFileName("^(\d+)")} {SrcFileName("(\d+)$")} and others |
Various parts of the source file's name:
|
| Source file extension | {srcfileext} | File extension. Example: docx |
| Source file folder | {srcfilefolder} | Folder path where the file is located.Example: C:\Work\Folder_A\Subolder_A |
| Source file folder name | {srcfilefoldername} | File directory name (file location name).Example: Subfolder_A |
| Source file path | {srcfilefullpath} | Full path to the source file, including the filename.Example: C:\Work\Folder_A\Subfolder_A\Document_A.docx |
| Source file path, 1-st part | {srcfilefullpath(1)} | The first part of the file path (not including the drive letter)Example: Work |
| Source file path, 2-nd part | {srcfilefullpath(2)} | The second part of the file pathExample: Folder_A |
| Source file path, 3-rd part | {srcfilefullpath(3)} | The third part of the file pathExample: Subfolder_A |
| Source file type | {srcfiletype} | File type.For example: Microsoft Office Word |
| Container name | {containername} | Name of an email message file, an archive (RAR, ZIP, 7ZIP), or a PDF Portfolio file. |
| File attributes | ||
| Source file date | {date} | Date of file processing by Print Conductor |
| Source file time | {time} | Time of file processing by Print Conductor |
| Source file author | {author} | Name of the user who created the file |
| Source file creator | {creator} | Software with which the file was created |
| Source file custom text | {customtext} | User-specified text which can be added to any list item using Item settings… (Custom text field) Note: if you have several columns, use {customtext}, {customtext(2)}, {customtext(3)}, etc. Learn more about sorting files by Custom text column → |
| Source file pages | {srcfilepages} | The total number of pages |
| Source file page number (numeric format) | {srcfilepageno} | The number of a page that is being printed, in numeric format ("1", "2", "3") |
| Source file page number (text format) | {SrcFilePageNo(Words)} | The number of a page that is being printed, in numeric format ("one", "two", "three") |
| User name | {user} | User account name in Windows |
| Computer name | {computer} | Computer name in Windows |
| Date/Time | {Date(M-d-yyyy)}, {Time(h-mm-ss tt)}, and more | Several macros that insert date and time (in various formats). They include Full date, Full time, Date, Date (DD.MM.YYYY), Year, Month, Day, Time, Time (HH:MM:SS), Hour, Minute, Second, Millisecond |
| Copies | {copies} | File's total number of copies |
| Copy | {copy} | Current copy number. Please note that this macro works properly only when Single print job mode is enabled. |
| Numbering for Lists | ||
| Item number in the List | {ListItemNo} | Item's index number (the very first column named "#") in the List of Documents |
| Items in the List | {ListItems} | The total number of items (files) in the List of Documents |
| Total pages in the List | {TotalPages} | The total number of pages of all items added to the List of Documents |
| Consecutive page number in the List | {ConsecutivePageNo} | Consecutive page numbers are counted within all items added to the entire List of Documents. This type of page numbering is also known as "Continuous page numbering across multiple documents" or simply "consecutive numbering," where all pages from a sequence of several documents are numbered continuously. Note: this macro works correctly only when printing with Single Print Job mode enabled. |
| Current List number | {SetNo} | The sequence number of the Document List currently being printed (when the Print the List of Documents setting is set to more than 1) |
| Total number of Lists | {SetNumber} | The total count of Document Lists to be printed (when the Print the List of Documents setting is set to more than 1) |
Image watermark
If you want to insert a watermark from an image file, you should choose a file, and then customize its size, position, transparency, etc. (if needed). By default, it is added to the right-bottom corner of a page/image. You can also specify the pages where the watermark must appear.
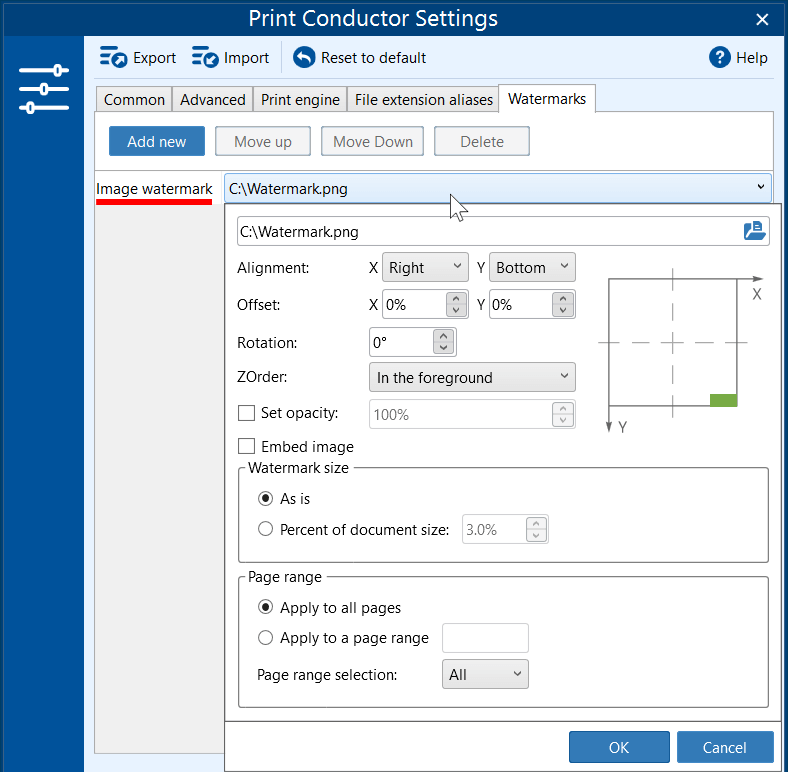
Image watermark parameters
| Setting or interface element | Functionality |
|---|---|
| File selection | Browse for the file to be used as a watermark. Popular formats, such as JPG, PNG, HTML, PDF are supported |
| Alignment | X-axis alignment: Left, Center, RightY-axis alignment: Top, Center, Bottom |
| Offset | Set X and Y offset as a percentage of the document height/width. You can enter positive or negative values to "move" the watermark |
| Rotation | Adjust the angle of watermark rotation to a certain degree |
| ZOrder | Set watermark Z-axis position: In the foreground or In the background |
| Set opacity | Change opacity to make watermark semi-transparent |
| Embed image | Enabling this option will save the image in the Print Conductor local folder. It can be used for loading presets |
| Watermark size | Select the original size (As is) or set the watermark size as a percentage of the document's page size |
| Page range | Select all pages or specify individual pages or a range of pages |
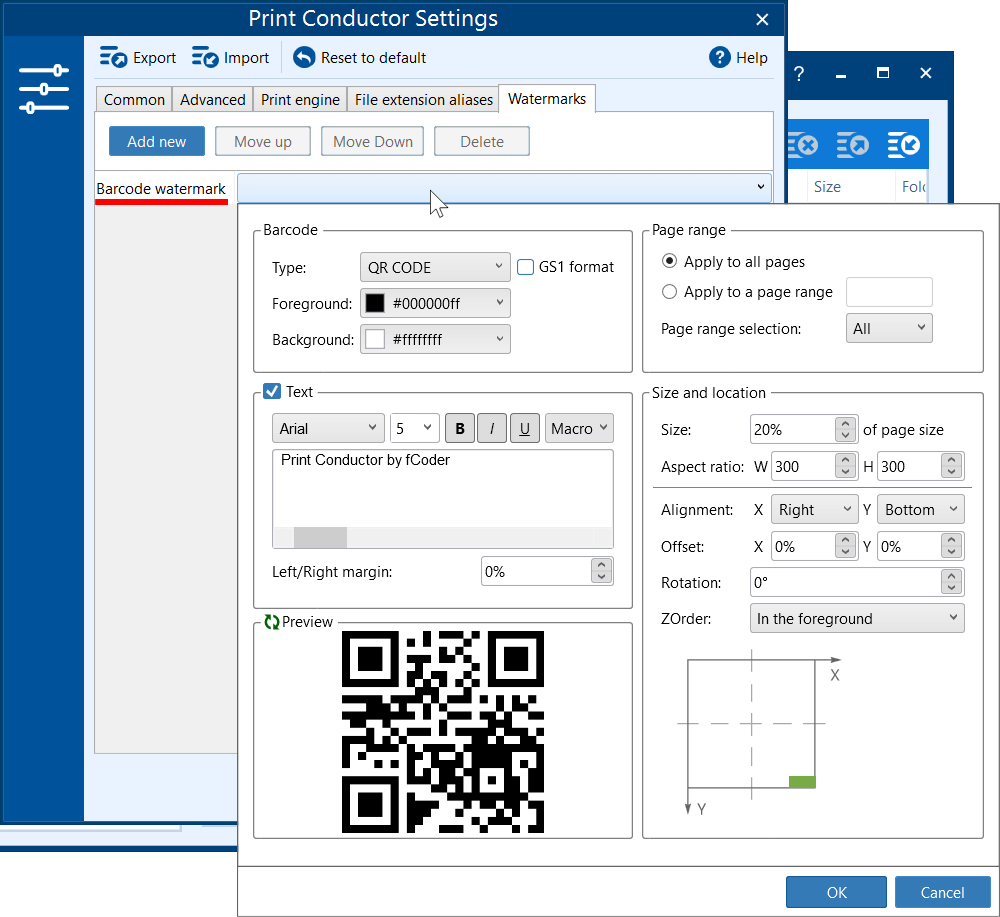
Barcode watermark
You can create and customize a barcode to be printed. Barcode watermark operation allows you to insert a barcode to document pages, e.g., a QR-code. Various barcode types are available, including Code 128, EAN, UPC, QR-CODE, and many more.
Applying watermarks to selected items only
If you only want to watermark specific documents in your batch — or if you need certain files to have a unique watermark while the rest use the standard one — you can configure this directly at the item level. This gives you advanced control over exactly which files get stamped.
By selecting one or multiple files in your List of Documents and opening their individual settings (Item settings…), you can choose exactly how watermarks behave for those specific items.
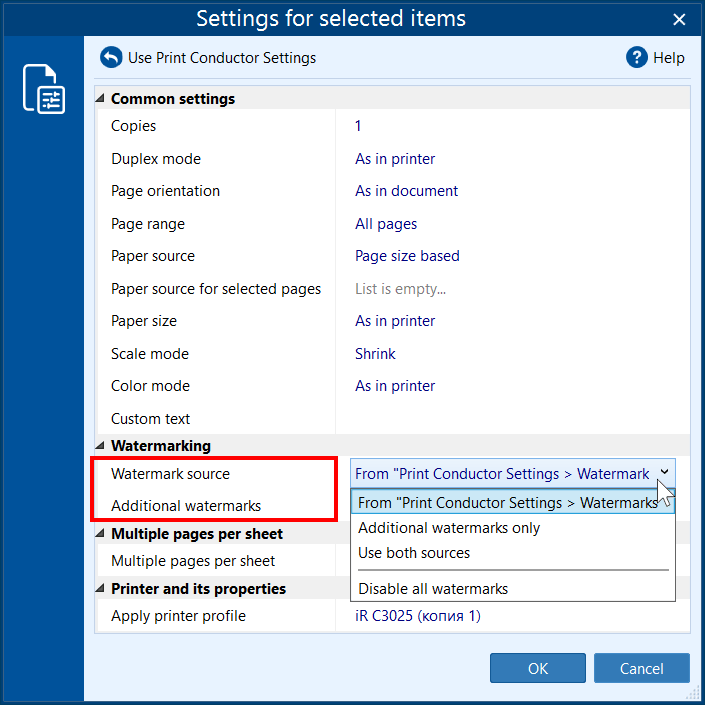
The Watermark source dropdown offers flexible options:
- From "Print Conductor Settings > Watermarks": Applies the standard, global watermarks you have already configured in the main program Settings.
- Additional watermarks only: Applies only the specific custom watermarks defined directly within this Item settings window, ignoring the global ones.
- Use both sources: Combines them, stamping the document with both the global watermarks and your item-specific watermarks.
- Disable all watermarks: Ensures the selected documents are printed completely clean, overriding any global watermark settings you have turned on.
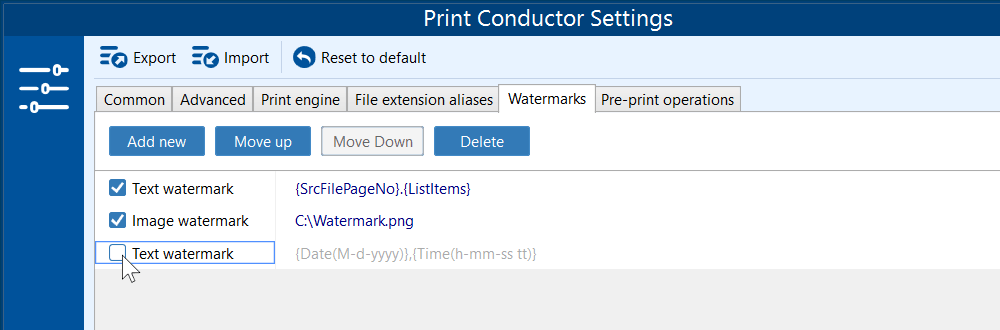
Enabling and disabling added watermarks
If you have multiple watermarks configured but do not want to apply all of them to your current print job, you no longer need to delete and recreate them. You can now easily toggle individual watermarks on or off using the checkboxes in the list. This is especially useful if you have complex watermark setups (like specific date/time macros or company logos) that you only need to use occasionally.
How to toggle watermarks on or off:
- Open Print Conductor and go to Settings → Watermarks.
- Locate your previously configured watermarks in the list.
- Check the box next to a watermark to enable it, or uncheck the box to disable it for the upcoming batch print session.
- Click OK to save your changes.
To add any type of watermark:
- Go to Print Conductor Settings > Watermarks;
- Select the necessary type of watermark: Text watermark, Image watermark, Barcode watermark;
- Adjust the required parameters;
- Change watermark's vertical position (Z-axis) using Move up and Move down buttons;
- Click OK;
- Add more watermarks if necessary;
- Add documents to the List of Documents and print them.