
What’s new in Print Conductor 6.0:
Added- Ability to add crop marks for PDF, image files, Word, Excel documents
- Ability to validate digital signatures when printing PDF files
- Ability to pause the batch printing process at any certain point and then resume it
- Ability to instantly get error reports on documents which failed to print
- Ability to set paper format for Report and Cover pages
- Localization to the Dutch and Chinese languages
Improved
- Improved PDF printing engine
- Ability to enter password for password-protected PDF, DOC or DOCX documents in the interface
Fixed
- Fixed fast-detecting of page numbers of PDF files
- Fixed issues with printing Microsoft Visio files
- Fixed issues with printing Microsoft Word files
- Fixed line number display in the List of Documents
Ability to add crop marks for PDF, image files, Word, Excel documents

Print Conductor 6.0 can add crop marks to your PDF, image files as well as DOC, DOCX, XLS, XLSX, PPT and PPTX documents. Сrop marks appear at the corners, outside the printable area of an image or document. Crop marks indicate where you want the printed paper to be cut.
What are crop marks used for?
Crop marks (also known as cut marks or trim marks) are lines printed in the corners of your publication’s sheets of paper to show where to trim the paper. This feature is useful if you want to create marks around several objects on a page, for example, when printing a sheet of business cards. Printers generally can’t actually print to the very edge of the paper, so instead they print on a larger sheet of paper and then trim it down to the correct size, and crop marks are used to define where to trim. So, to make crop marks visible, you must print on a paper size that is larger than the page size you have set for your image or document.How to add cut marks to PDF or image file
To print cut marks, go to "Settings", open Ini File Editor by pressing Ctrl + Alt + I and find line PrintCutmarks=0 and change it to PrintCutmarks=1. This will enable cut marks for PDFs and images.
 feature in Print Conductor")
In addition, you can switch on printing cut marks for other types of files: Word, Excel and PowerPoint documents. In order to print trim marks on these types of documents, please add the following lines in the end of the [General] section:
| SetExt_1="doc","abc" SetExt_2="docx","abc" SetExt_3="xls","abc" SetExt_4="xlsx","abc" SetExt_5="ppt","abc" SetExt_6="pptx","abc" |

It is possible to add just one or several lines, depending on which file formats you actually need:
| Line & value | Feature |
| SetExt_1="doc","abc" SetExt_2="docx","abc" | Crop marks for Microsoft Word DOC and DOCX files |
| SetExt_3="xls","abc" SetExt_4="xlsx","abc" | Crop marks for Microsoft Excel XLS and XLSX files |
| SetExt_5="ppt","abc" SetExt_6="pptx","abc" | Crop marks for Microsoft PowerPoint PPT and PPTX files |
Preview Crop Marks
Once you’ve set your print settings, paper size and enabled crop marks, you may want to preview them before the actual printing. We suggest using a virtual printer to do it, for example, Universal Document Converter. Just add your files to Print Conductor's List of Documents, select Universal Document Converter as a printing device and set image (JPG, PNG, etc.) as output format and click "Start Printing". Thus, you can visualize the outline of your document and crop marks on the paper.Ability to validate digital signatures when printing PDF files
New version of Print Conductor allows you to verify digitally signed PDF documents.Print Conductor verifies printed documents digitally signed using X.509 Public Key Certificate. A primary function of the certificate is to authenticate the owner's identity. There are typically three algorithms involved with the digital signature process:
- Key generation. This algorithm provides a private key along with its corresponding public key.
- Signing. This algorithm produces a signature upon receiving a private key and the message that is being signed.
- Verification. This algorithm checks for the authenticity of the message by verifying it along with the signature and public key.
The validation checks the following conditions:
- Who signed the document?
- Is the author of the signature on the trusted people list?
- Is the signature correct from a technical point of view?
- Has the document been edited after signing?
Sometimes it may be necessary to sign or verify the digital signature of PDF documents in automatic or batch mode. This is especially relevant for intercorporate document workflow, since the transfer of legally signed documents in electronic form costs much less than the preparation and transfer of documents in paper form.
How to validate digitally signed documents
To enable verification of digitally signed documents by Print Conductor, go to "Settings", open Ini File Editor (Ctrl + Alt + I), find line ValidateDigSign=1 and make sure it has value "1". Value "0" will switch off automatic validation.When you print with Print Conductor, the program will detect, if the signature is valid or not and automatically place a "✔" or put an "X" symbol beneath the signature. Below are some examples of secure and nonsecure signatures:

Ability to insert Pause into the List of Documents
With the new version of Print Conductor you can now pause the process batch printing at any certain point and then resume it. Pause is added as as separate line in the List of Documents, and you can several pauses within the List, if necessary.To insert a -Pause- line, add files to the List of Documents and right click where the printing should be resumed after a break, then select "Insert" and "Pause" in the context menu:

You will get a dialog window which prompts you to resume printing. Click "OK" and "Resume" to proceed:

Ability to instantly get error reports on documents which failed to print
We have another interface & usability improvement: now if some of the documents failed to print, you can click the "X" error symbol next to it to see the description of an error. You will get an extract from log file regarding this file and see the reason why this document was not successfully printed. Here's an example of an error due to incorrect password:

Ability to set paper format for Report and Cover pages
Now you can set the desired paper format (size) for service pages.Print Conductor can optionally produce additional service pages - a Cover page and a Report page. Cover page is used to separate printed copies of documents, whereas the Report page displays information on print jobs. By default, these pages have A4 paper format. Our customers asked us to have an ability to change paper size for them, and it is available now.
To set a certain paper size for service pages, go to "Settings", open Ini File Editor by pressing Ctrl + Alt + I and find line AdditionalPaperSize="" in the [General] section. Change this line to one of the lines below to specify the necessary paper format:
| Line & value | Paper size |
| AdditionalPaperSize="" | A4 (default) |
| A-series | |
| AdditionalPaperSize="A0" | A0 |
| AdditionalPaperSize="A1" | A1 |
| AdditionalPaperSize="A2" | A2 |
| AdditionalPaperSize="A3" | A3 |
| AdditionalPaperSize="A4" | A4 |
| AdditionalPaperSize="A5" | A5 |
| AdditionalPaperSize="A6" | A6 |
| B-series | |
| AdditionalPaperSize="B0" | B0 |
| AdditionalPaperSize="B1" | B1 |
| AdditionalPaperSize="B2" | B2 |
| AdditionalPaperSize="B3" | B3 |
| AdditionalPaperSize="B4" | B4 |
| AdditionalPaperSize="B5" | B5 |
| AdditionalPaperSize="B6" | B6 |
| ANSI | |
| AdditionalPaperSize="ANSI-A" | ANSI-A |
| AdditionalPaperSize="ANSI-B" | ANSI-B |
| AdditionalPaperSize="ANSI-C" | ANSI-C |
| AdditionalPaperSize="ANSI-D" | ANSI-D |
| AdditionalPaperSize="ANSI-E" | ANSI-E |
| Common loose sizes | |
| AdditionalPaperSize="Letter" | Letter |
| AdditionalPaperSize="Tabloid" | Tabloid |
| AdditionalPaperSize="Legal" | Legal |
| AdditionalPaperSize="Statement" | Statement |
| AdditionalPaperSize="Executive" | Executive |
| AdditionalPaperSize="Folio" | Folio |
| AdditionalPaperSize="Quarto" | Quarto |
| AdditionalPaperSize="Note" | Note |
| Envelope | |
| AdditionalPaperSize="Envelope#9" | Envelope#9 |
| AdditionalPaperSize="Envelope#10" | Envelope#10 |
| AdditionalPaperSize="Envelope#11" | Envelope#11 |
| AdditionalPaperSize="Envelope#12" | Envelope#12 |
| AdditionalPaperSize="Envelope#14" | Envelope#14 |
| AdditionalPaperSize="Envelope#16" | Envelope#16 |
| AdditionalPaperSize="EnvelopeC3" | EnvelopeC3 |
| AdditionalPaperSize="EnvelopeC4" | EnvelopeC4 |
| AdditionalPaperSize="EnvelopeC5" | EnvelopeC5 |
| AdditionalPaperSize="EnvelopeC6" | EnvelopeC6 |
| AdditionalPaperSize="EnvelopeC65" | EnvelopeC65 |
| AdditionalPaperSize="EnvelopeB4" | EnvelopeB4 |
| AdditionalPaperSize="EnvelopeB5" | EnvelopeB5 |
| AdditionalPaperSize="EnvelopeB6" | EnvelopeB6 |
| AdditionalPaperSize="EnvelopePersonal" | EnvelopePersonal |
| AdditionalPaperSize="EnvelopeMonarch" | EnvelopeMonarch |
| ARCH | |
| AdditionalPaperSize="ARCH A" | ARCH A |
| AdditionalPaperSize="ARCH B" | ARCH B |
| AdditionalPaperSize="ARCH C" | ARCH C |
| AdditionalPaperSize="ARCH D" | ARCH D |
| AdditionalPaperSize="ARCH E" | ARCH E |
| AdditionalPaperSize="ARCH E1" | ARCH E1 |
| AdditionalPaperSize="ARCH E2" | ARCH E2 |
| AdditionalPaperSize="ARCH E3" | ARCH E3 |
Localization to Dutch and Chinese
We keep taking over the world by expanding the number of languages available in Print Conductor. Dutch (Nederlands) and Chinese Simplified (汉语) have been added in the latest version. If you happen to find any flaws in translation or if you have any suggestions, or if you don't see your native language available - please contact us.Improved PDF printing engine
Significant changes to the PDF and image printing engine have been made. We've reduced the amount of file operations for processing each document and now there's less load on your hard drive, which was redistributed to the random access memory (RAM). This optimization results in less time for document printing, if you work, for example, on a terminal server and have heavy load with multiple users involved.Ability to enter password for password-protected PDF, DOC or DOCX documents
With Print Conductor you can easily print password-protected PDF, DOC or DOCX documents. Moreover, now a password can be set directly in the interface - you can find a new field in the Advanced Settings (you can make it visible by clicking the closed-eye icon):
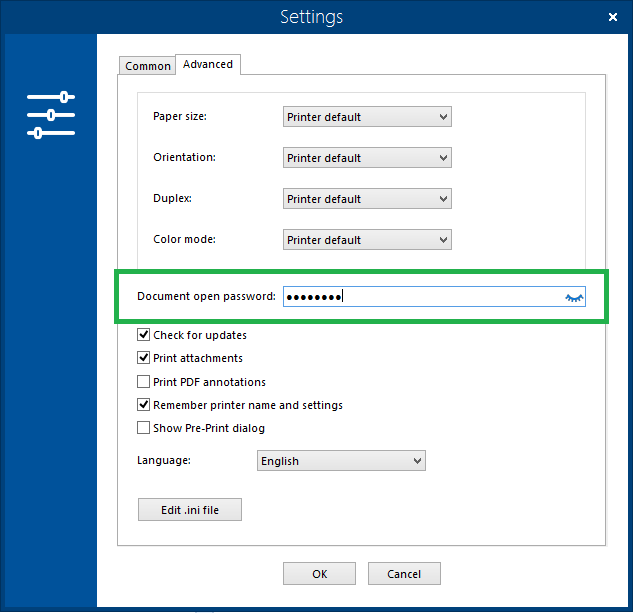
The password should be valid for all password-protected files being added to the List of Documents.