
To cancel a print job in Windows 11, open Settings → Bluetooth & devices → Printers & scanners, select the printer, and choose Open print queue. Right-click the unwanted job and choose Cancel. If the job remains on Deleting, restart or stop the Print Spooler.
 Using Print Conductor? Click Pause first. This stops the program from continuing through the batch while you cancel jobs that have already reached Windows.
 A practical rule for stopping any print job
If printing does not stop, use one rule:
Stop the source of new jobs first, then clear the queue where the job still appears.
For a Print Conductor batch, start with Pause, then follow the job through Windows and, if applicable, the print server or printer — only as far as needed.
 Printer already feeding paper or labels?
Press the printer’s physical Cancel or Stop button first. This may stop the paper output, but it does not necessarily remove the digital job. Clear the relevant queue afterward.
Do not pull media while the feed mechanism is moving. After the output stops, clear the remaining digital job from Windows, the print server, or the printer’s own queue.
Example scenario: "I accidentally sent 250 labels to my Rollo printer, and the system won't let me kill the print job!"
Contents
- Quick Steps
- Using Print Conductor? Pause first
- How to cancel a print job in Windows 11
- How to cancel a print job in Windows 10
- If the print job is stuck and won’t cancel
- How to stop a printer that is already producing pages
- Why the printer can keep printing after cancellation
- How Print Conductor helps control large batches
- Network printers and printer memory
- Before the next large batch: a quick preflight check
- Frequently asked questions
Quick Steps
- If Print Conductor started the batch, click the Pause button (in the main window) to stop it from continuing through the remaining files.
- Open the Windows print queue for the selected printer. See the Windows 11 and Windows 10 instructions below.
- Inspect the selected printer’s Windows queue and cancel the unwanted job(s) already visible there.
- If they still stay in the queue after cancelling, restart the Print Spooler service.
- If the queue is still stuck, stop the Print Spooler, remove the local spool files, and start the service again.
- If printing continues after the Windows queue is empty, check the print server, the printer's controls, or its internal memory. In a managed office, you may need to contact the IT administrator.
In short: stop the source of new jobs first, then clear the queue where the job still appears.
Using Print Conductor? Pause first
Print Conductor submits files to the Windows printing system. Pause stops the application from submitting more files, while Windows Cancel requests removal of jobs that have already reached a printer queue.
If you need to stop a run, start with Pause, then check the selected printer’s Windows queue for jobs that have already been sent there.
Use this order:
- Click Pause in Print Conductor.
- Open the Windows queue for the printer selected in Print Conductor (Settings → Devices → Printers and scanners → Open queue on chosen printer).
- Cancel the jobs that are already visible in Windows.
- If jobs won't cancel, restart Print Spooler.
- If a service restart does not remove the job, clear the local spool files.
If the job disappears from the Windows queue and physical printing stops after step 3, you're done. If the job remains on Deleting or the printer keeps producing pages, continue with the Print Spooler steps below.
Pausing the List of Documents in the first place is necessary to prevent Print Conductor from immediately repopulating the queue after you've emptied it.
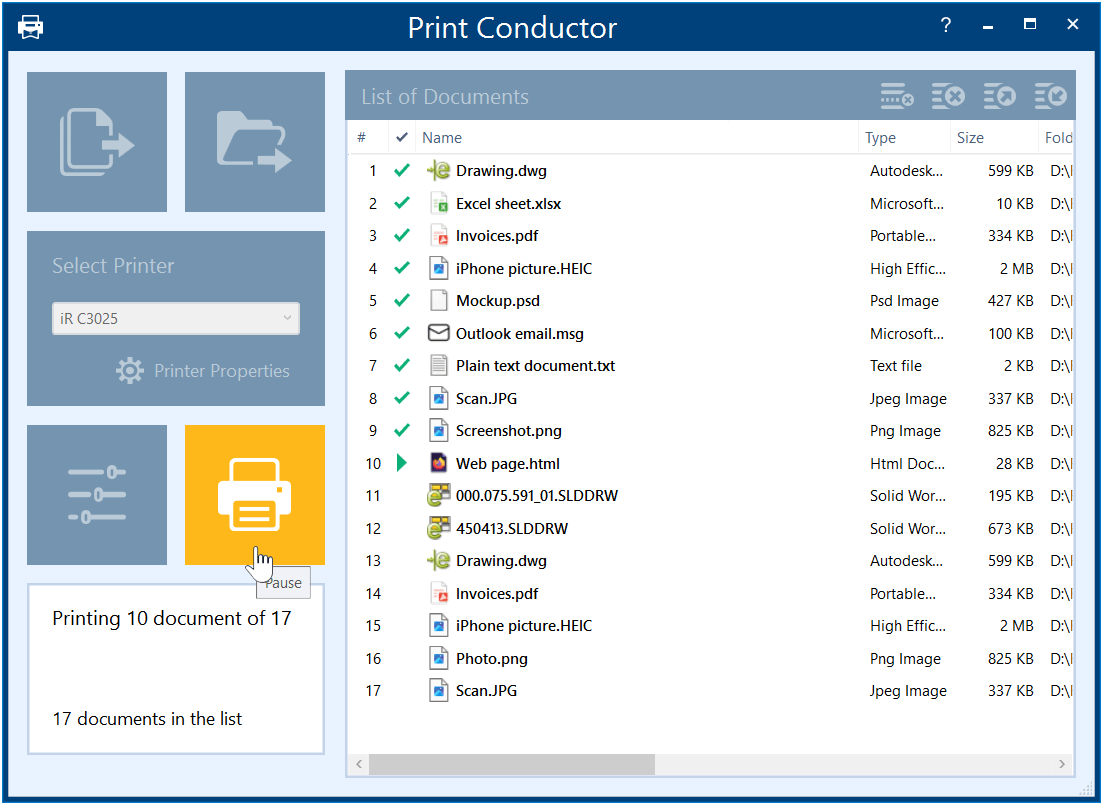
Pause button in Print Conductor
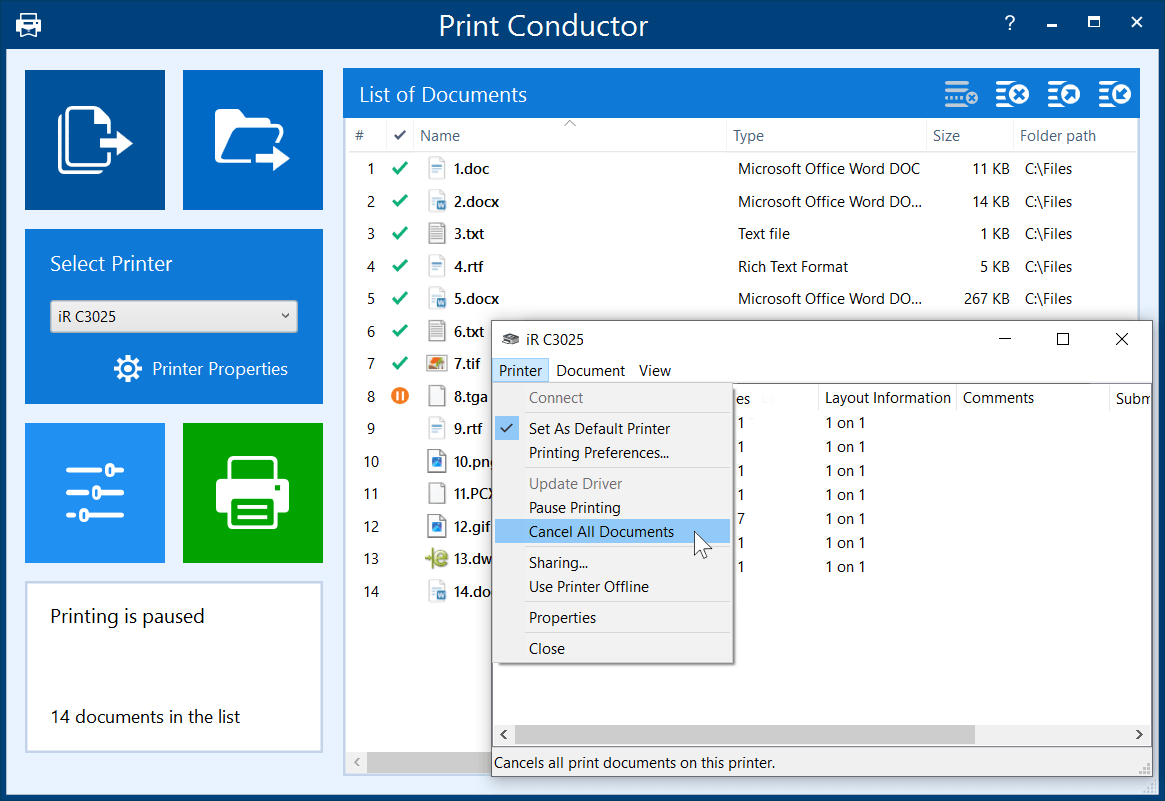
Cancelling jobs handed off to Windows print spooler
How Pause works
Pause does the following:
- Stops from submitting more files and prevents Print Conductor from immediately repopulating the queue.
- Usually ceases processing of the current item.
What happens to the current item?
Depending on the timing, the item currently being processed may still appear in Windows after you click the Pause button. Processing the current item usually ceases, but sometimes it may already have been handed off to Windows and can still be physically printed.
Important: Print Conductor's Pause button does not cancel jobs that Windows has already accepted.
Pause, Clear List, and Windows Cancel are different actions
Pause and Windows Cancel work at different points. Start with Pause, then open the selected printer’s Windows queue and cancel the jobs already visible there.
| Action | Where it works | What it is for |
|---|---|---|
| Pause | Print Conductor processing | Used to hold the batch while you inspect jobs that have already been sent to Windows. |
| Clear List | Print Conductor's List of Documents | Works on the working list in Print Conductor; Clicking the Clear List button removes all items from the Print Conductor main window but it doesn't affect jobs that are already visible in Windows. |
| Cancel in Windows | The selected Windows print queue | Requests removal of jobs from a specific printer queue; it does not rebuild or clear the Print Conductor list. |
How to cancel a print job in Windows 11
To cancel a job in Windows 11, start with the printer queue. Use the Print Spooler methods only if the job does not disappear.
- Open Start → Settings → Bluetooth & devices → Printers & scanners.
- Select the printer.
- Choose Open print queue.
- Select or right-click the unwanted job and select Cancel. To remove every visible job, use "Cancel All Documents" if that command is available in your Windows queue interface.
If the job disappears, you are done. If it stays on Deleting or does not change, continue to the Print Spooler section below. Microsoft’s Windows printer troubleshooting guidance documents the same Windows 11 queue path.
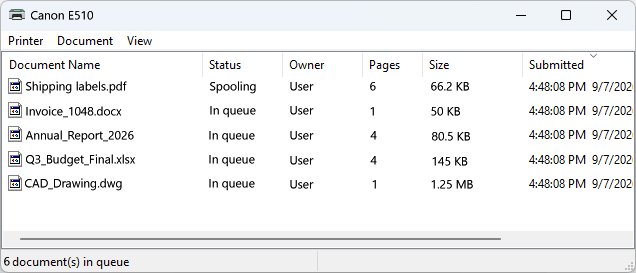
The process for cancelling jobs may look slightly different
Some printer manufacturers (such as Canon, HP, Brother, Epson, and others) provide their own print queue or print management software. If your printer uses vendor-specific software, the queue may open automatically there instead of the standard Windows print queue. The process for cancelling jobs is generally similar.
How to cancel a print job in Windows 10
Windows 10 uses a different Settings path:
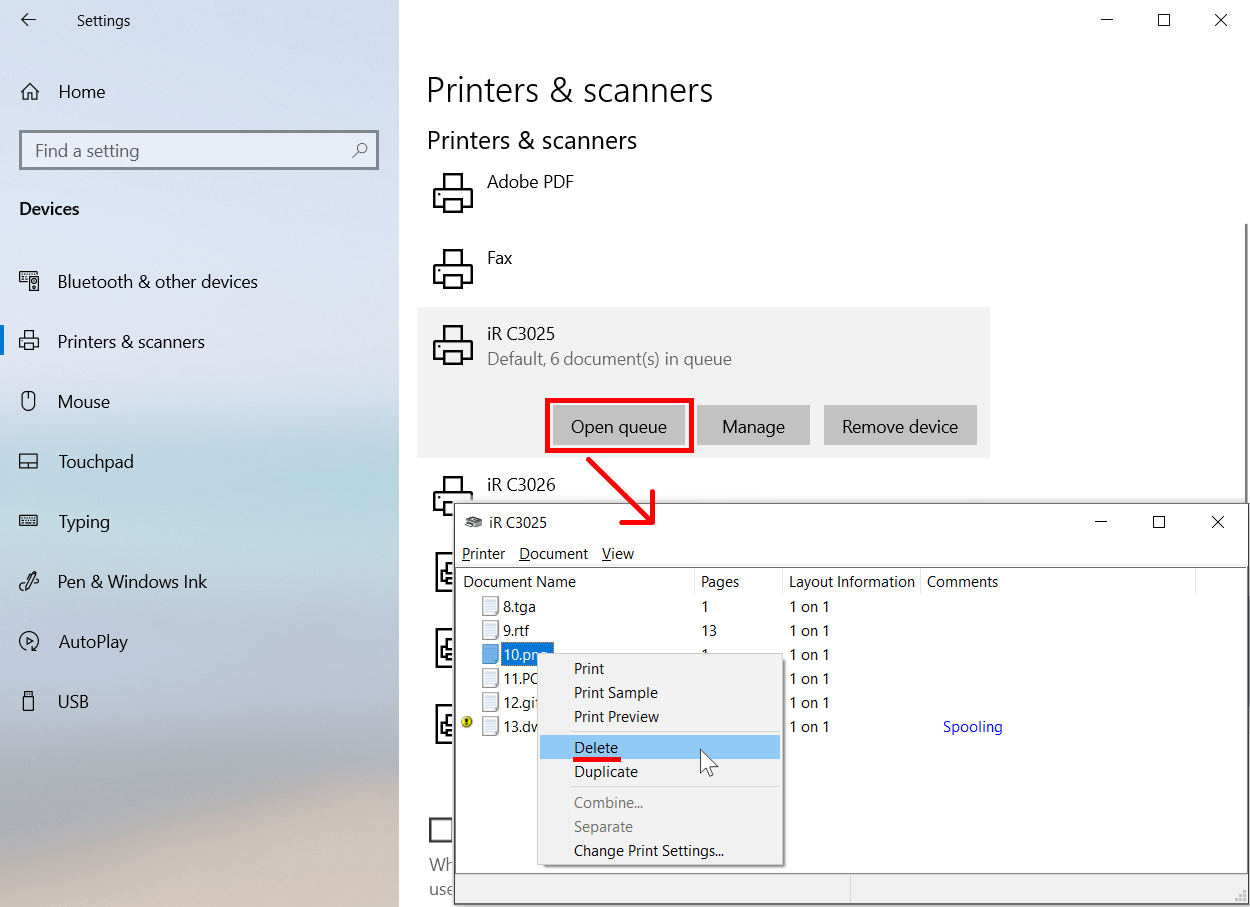
- Open Start → Settings → Devices → Printers & scanners.
- Select the printer and choose Open queue.
- Select or right-click the unwanted job(s) and choose Cancel.
Note: Microsoft ended support for Windows 10 on October 14, 2025, but its printer troubleshooting page still documents the queue path for computers that remain on Windows 10.
If the print job is stuck and won’t cancel
When you select Cancel in the Windows print queue, Windows tries to remove the job. If the job stays on Deleting or does not change, try the following methods in order. Move to the next method only if the previous one does not work.
| What you see | What to do next |
|---|---|
| Print Conductor is still processing | Click Pause to stop further batch processing; then inspect the selected Windows queue and cancel jobs already visible there. |
| The job appears in the Windows queue | Select the job(s) and choose Cancel. |
| The job remains on Deleting | Restart the Print Spooler; clear the spool folder if needed. |
| Jobs return after cancellation | Stop the source, then check the local queue, server-side queue, and printer. |
| The Windows queue is empty, but printing continues | Check the print server, printer controls, or printer memory. In a managed office, contact the print administrator. |
Step 1: Restart the Print Spooler
The Print Spooler is the Windows service that stores and manages print jobs before sending them to a printer. The list of pending jobs is called the print queue.
If the job stays on Deleting after you select Cancel in the Windows print queue, restart the Print Spooler before using the manual cleanup below. Restarting the service may release a job that Windows has not finished removing.
- Press
Win + R. - Enter
services.msc. - Find Print Spooler.
- Right-click it and select Restart.
- Reopen the printer queue and check whether the job has been removed.
If the job remains in the queue, continue with the manual spool-folder cleanup below.
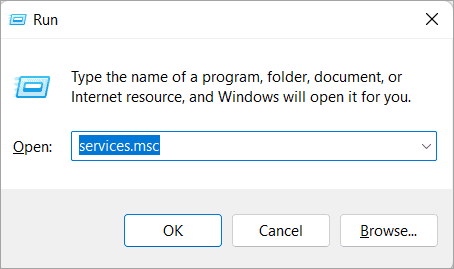
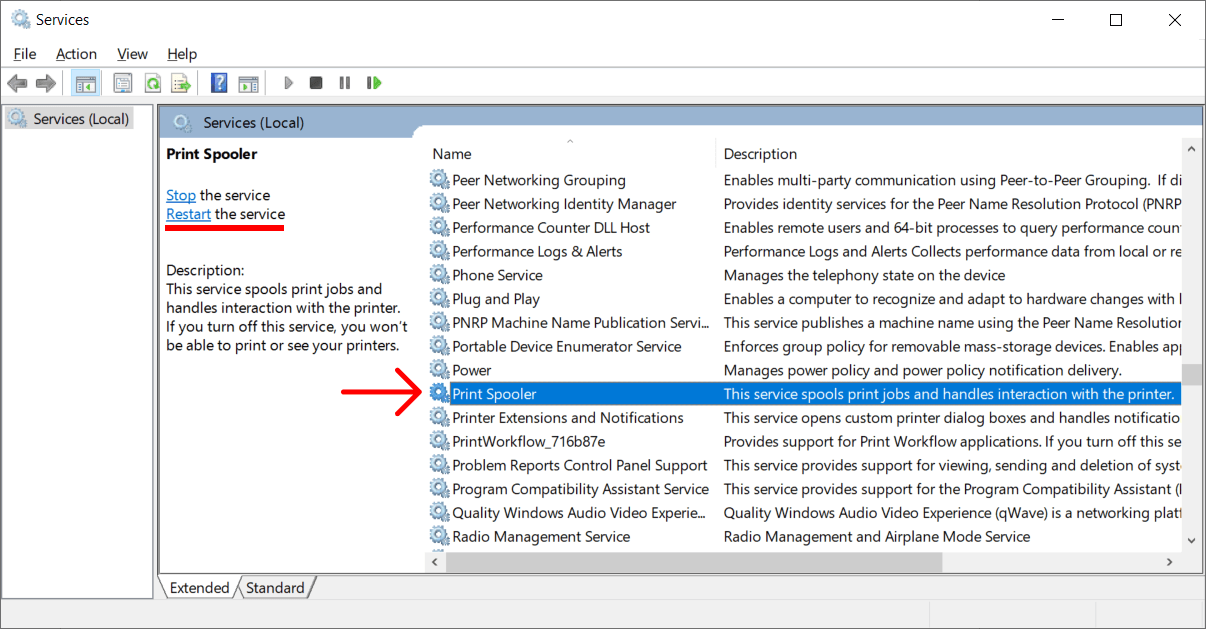
Microsoft recommends restarting the Print Spooler when print jobs freeze or remain stuck in the queue.
Step 2: Clear the local spool folder
If a service restart does not remove the job, stop the Print Spooler service and delete the local spool files to prevent Windows from using those files.
Important: This removes all locally spooled print jobs on this PC, potentially including jobs for other printers. On a shared or managed computer, check with your administrator first.
- Open
services.msc. - Right-click Print Spooler and select Stop.
- Open File Explorer and go to
C:\Windows\System32\spool\PRINTERS. - Delete the files inside the
PRINTERSfolder (Do not delete the folder itself). - Return to Services, right-click Print Spooler, and select Start.
- Reopen the printer queue before sending the batch again.
This method requires administrator privileges. The stop-clear-start sequence removes pending data from the local spool folder. Please note that it will not remove a copy already held by a print server or by the printer. Microsoft documents the same sequence for a print job stuck in the queue.
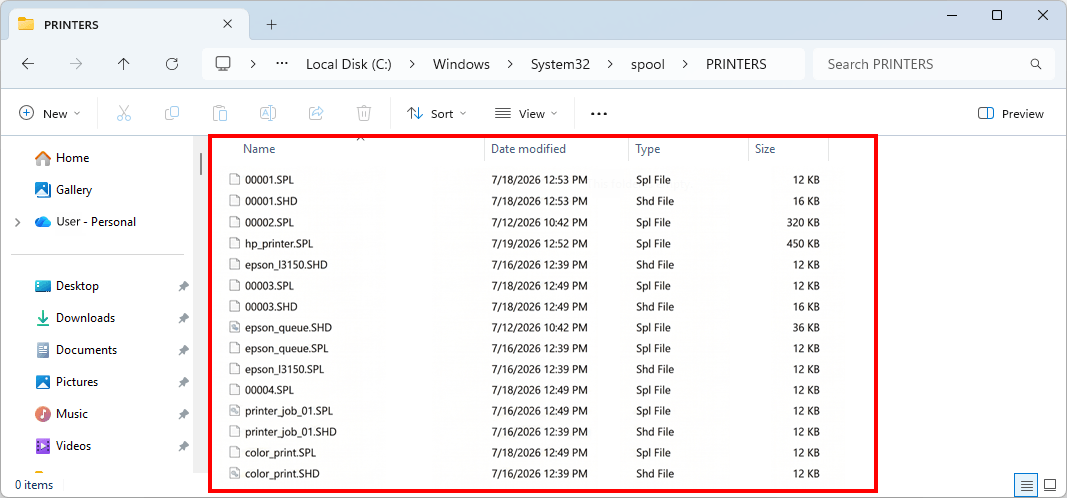
Command Prompt alternative
This is an optional method for experienced users who prefer to run the same stop-clear-start sequence from an elevated Command Prompt.
net stop spooler
del /F /Q "%systemroot%\System32\spool\PRINTERS\*"
net start spooler
Warning: Check the path before running the delete command: files removed with del are not sent to the Recycle Bin.
Step 3: Restart the PC and printer
If the queue is still stuck after the previous steps, restart both devices:
- Shut down the printer.
- Wait at least 60 seconds.
- Turn the printer back on.
- Restart Windows: select Start → Power → Restart.
- After both devices are ready, confirm that the queue is empty and test with one small document.
How to stop a printer that is already producing pages
If incorrect pages or labels are already feeding, stop the physical output first, then return to the digital queues.
- Press the printer’s physical Cancel or Stop control. If the printer has no Cancel or Stop control, follow the manufacturer's shutdown instructions.
- Do not pull paper or labels while the feed mechanism is moving.
- Use the power switch only as a last resort and follow the manufacturer’s shutdown instructions.
- After the mechanism stops, clear the local queue, server-side queue, or source that is still holding the job.
Hardware stop does not necessarily delete the job from Windows
Remember: hardware stop does not necessarily delete the job from Windows or from a print server. If you do not clear the remaining digital job, it may continue or be sent again when the device is ready.
Why the printer can keep printing after cancellation
Cancel can remove a job only from the queue where it still appears. By the time paper starts moving, the job may have passed through several stages:
Print Conductor → local Windows Print Spooler → (optional) print server → printer internal queue or memory
- After you pause Print Conductor, jobs already submitted to Windows may remain in the Windows queue.
- After you cancel a job in Windows, the printer may continue with data it has already received.
- If jobs reappear, the source application, a server-side queue, or retained local spool data may still be active.
- If the printer is shared, an administrator may need to remove the job from the print server.
How Print Conductor helps control large batches
Print Conductor provides different ways to submit a large batch. The most useful option depends on whether the documents must remain separate, stay together as one job, or be easier to interrupt.
Choose the right batch mode
| Option | What it changes | Cancellation trade-off |
|---|---|---|
| Wait until printer queue is empty (Settings → Advanced) | Print Conductor waits until the monitored Windows queue is empty before submitting the next file. | Limits Print Conductor submissions in that queue to one job at a time. It may slow down the batch, but it helps preserve the document order. |
| Single Print Job mode (Settings → Advanced) | Combines the List of Documents into one Windows print job. | Creates one queue entry, but the entire batch becomes one large job and may continue after reaching the printer. |
If easier interruption is the priority, Wait until printer queue is empty may leave fewer Print Conductor jobs waiting in Windows. If keeping the files together is the priority, Single Print Job may be more suitable. Neither option can cancel data that has already moved to a print server or printer memory.
More about Single Print Job mode →
How to enable the Wait until printer queue is empty setting →
Reuse previously saved lists and settings
For repeated batches, save a verified Print Conductor configuration and List of Documents. Reusing the correct printer, paper size, orientation, tray, copy count, and finishing settings can reduce setup errors before printing begins.
Exporting List of Documents with current print settings →
Loading previously saved settings and configurations →
Network printers and printer memory
With a shared printer, a print server may hold the job after it disappears from your local Windows queue. Check the printer's control panel or web interface; in a managed office, ask the administrator to inspect the server-side queue. If both queues are empty, the printer may already have buffered enough data to continue printing.
Use the printer's Cancel, Stop, or Reset control as appropriate. If the printer is remote or managed by your organization, contact the print administrator rather than changing server settings yourself.
Before the next large batch: a quick preflight check
A short test is usually faster than recovering from a large batch sent with the wrong settings.
- Verify the selected printer and number of copies.
- Print one small test document or label.
- Check paper or label size, tray, orientation, duplex mode, and finishing.
- Confirm that the previous Windows queue is empty.
- In Print Conductor: Load a verified List of Documents and Print Conductor configuration for repeated tasks.
- In Print Conductor: Choose Wait until printer queue is empty or Single Print Job according to the batch and recovery trade-off.
Frequently asked questions
Why won't the print queue clear, or why is the job stuck on Deleting?
Windows may have accepted the cancellation request without completing it. The Print Spooler may be busy or unresponsive, the source may still be sending work, or the job may be waiting on a print server. Restart the Print Spooler and, if necessary, clear the local spool folder using the steps above.
Why do jobs return after I clear the queue?
The application that started the batch may still be submitting files, a shared print server may still hold the job, or retained local spool data may remain. Stop new submissions first, then check the local queue, server-side queue, and printer.
Why is the Windows queue empty while the printer is still printing?
The printer may already have received the data, or the job may be coming from a print server or the printer's internal memory instead of the local queue. Use the printer controls or ask the print administrator to inspect the server-side queue.
Restarting the printer does not necessarily clear the Windows queue. If jobs remain in Windows, they may be sent to the printer again after it restarts.
Why can't Print Conductor cancel jobs already sent to Windows?
Print Conductor can stop processing the remaining batch via Pause, but it cannot cancel a job after that job has been submitted to the Windows printing system. Once a file has been handed off, it must be canceled in the Windows queue, on the print server, or through the printer's controls, depending on where the job is currently held.
How do I cancel all print jobs?
If Print Conductor started the batch, click Pause first. Then open the selected printer's Windows queue and cancel all visible jobs. If they remain on Deleting, restart the Print Spooler or clear the local spool folder using the steps above. Clearing the spool folder removes all locally spooled jobs on the PC, not only jobs for the selected printer.
Related guides and sources:
- Microsoft: Fix print job stuck in queue errors in Windows
- Microsoft: View a printer's print queue in Windows
- Print Conductor: Use Single Print Job mode
- Print Conductor: Configure the List of Documents
- Print Conductor: Solve common printing issues
- Print Conductor: Manage print settings
- Print Conductor: Create and apply printer profiles