Batch printing Word documents saves a tremendous amount of time compared to opening and printing each file individually.
With batch printing, you simply select all your Word files (.doc, .docx) and print them in one go. This eliminates repetitive steps and allows you to focus on other tasks while your documents print. Using Print Conductor for batch printing removes the need to open each file separately — just add files to the list, choose a printer, and begin printing. This smarter approach is significantly more efficient and reliable than manual methods. Keep reading for a detailed and easy batch printing guide.
On this page:
- Quick steps to mass print Word documents
- Printing Word documents black and white (grayscale) or in color
- How to change page orientation when printing DOC or DOCX files
- Applying Word's Update Fields, Hide Revisions/Comments, and other print options
- Printing Word documents with external data
- Changing print engine if DOC or DOCX files are not correctly rendered
- Printing Word files if they have non-standard file extension (other than .doc or .docx)
- Additional software for Word documents processing
- Questions or issues?
Quick steps to mass print Word documents
Step 1
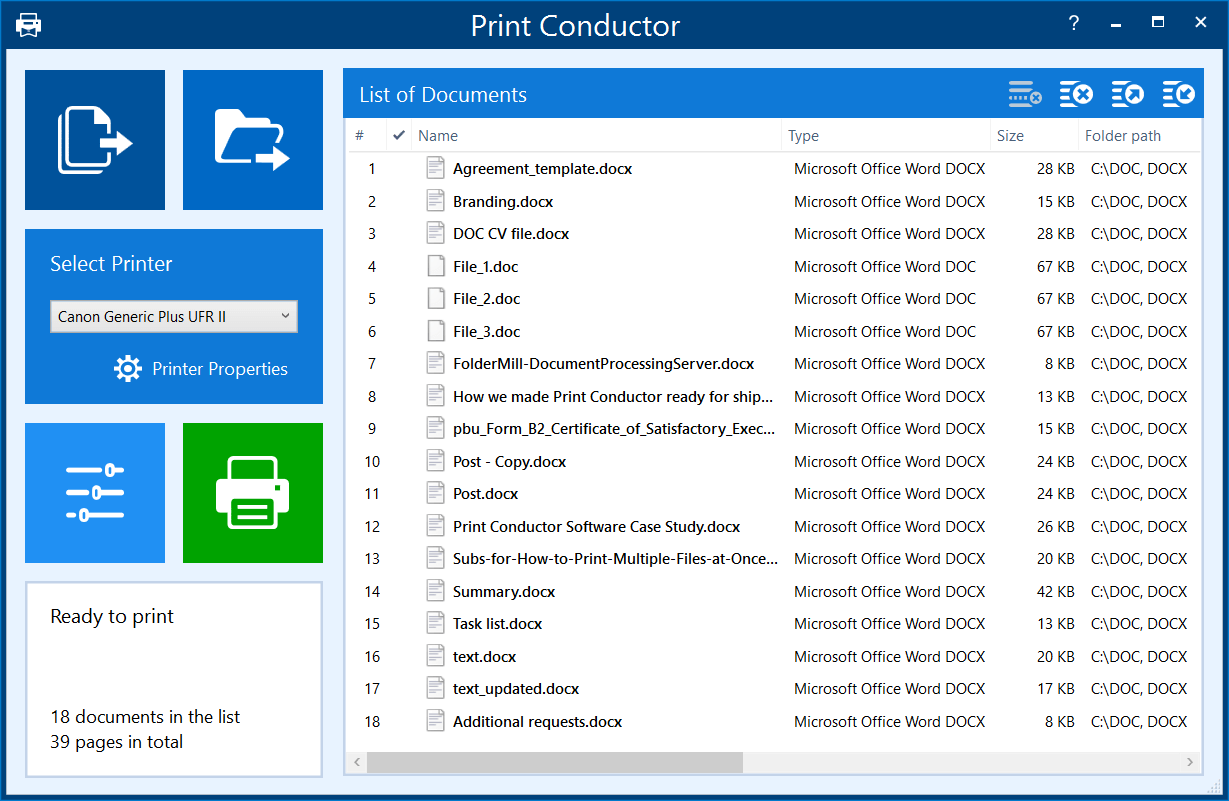
To print one or several Word documents, open Print Conductor and click the Add Files button (or drag and drop your Word documents into the program window). You can also click Add Folder if you want to import all Word documents from a specific folder. Once the files are added to the print list, you’ll see their names, formats, and other information displayed in the interface.
Step 2
Next, Select your printer from the Select Printer section. Make sure the correct printer is chosen. In Print Conductor, the selected device appears in the toolbar. Click to change if needed.
Step 3
You can adjust print options (copies, page range, etc.) for all files in the List by clicking the Settings button right below the printer selection toolbar.
Step 4
Once everything is set up, click the Start Printing button. Print Conductor will send your Word files to the selected printer one by one, saving you the hassle of opening and printing each file manually.
Step 5
Monitor the progress and take the printouts from the printer tray! Print Conductor shows progress and page counts. You can pause or stop the batch job at any time if necessary.
Reordering (optional)
Print Conductor allows you to rearrange items in the list to customize your print order. This feature prints your documents in your preferred sequence. However, your files may still get mixed during printing. For guaranteed sequential printing, we recommend using the Single Print Job mode.
Limitations of printing from Windows Explorer (without Print Conductor)
- Windows Explorer's right-click "Print" feature limits you to printing only 15 files at once.
- Files will print in a random order rather than sequentially.
- All files use the same default printer settings with no option to customize settings for the printing session or individual files.
- You can only use one printer, whereas Print Conductor offers Round robin and Load balancing printing modes.
- The "Print" button won't appear when selecting files of different formats (like DOC and DOCX) together.
- Advanced options like adding separator pages between documents aren't available.
Printing Word documents black and white (grayscale) or in color
You can easily choose whether to print in color or black and white, depending on your preferences or printing needs. This is especially useful for saving ink or toner when color printing isn’t necessary.
In Microsoft Word, you can choose color or grayscale by clicking File → Print → Printer Properties (or Preferences). Many printers have a Grayscale or Black & White mode checkbox here. Selecting grayscale will use only black ink/toner.
Setting color mode via Printer Properties
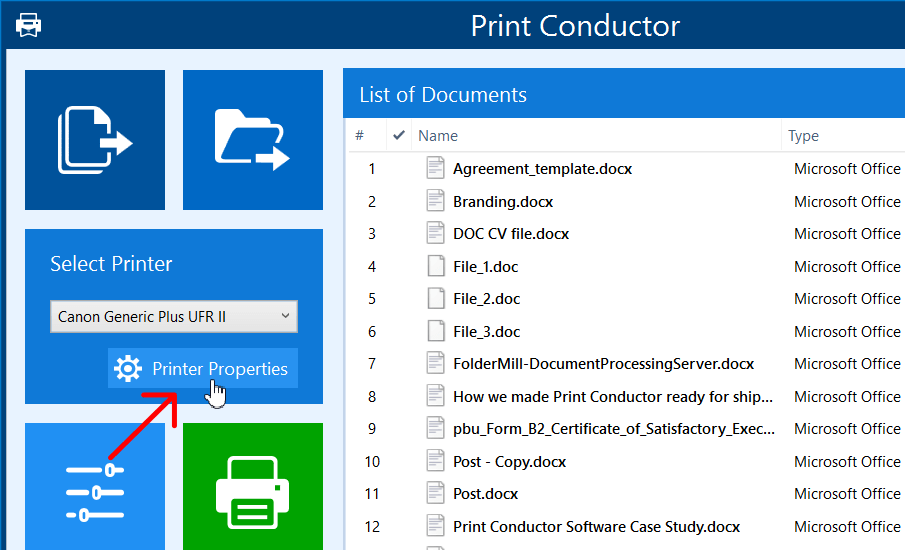
When batch printing Word files, open Print Conductor and navigate to your printer driver control panel by clicking the Printer Properties button on the program's main window. Here, you’ll find the option to switch between color and grayscale (black & white) printing. The exact name of this setting may vary depending on your printer model — look for options like "Color mode", "Print in Grayscale", or "Monochrome".
If you're using this method, make sure that color mode in Print Conductor is set to As in printer to let the software use printing preferences that are defined by your printer.
Setting color mode by Print Conductor
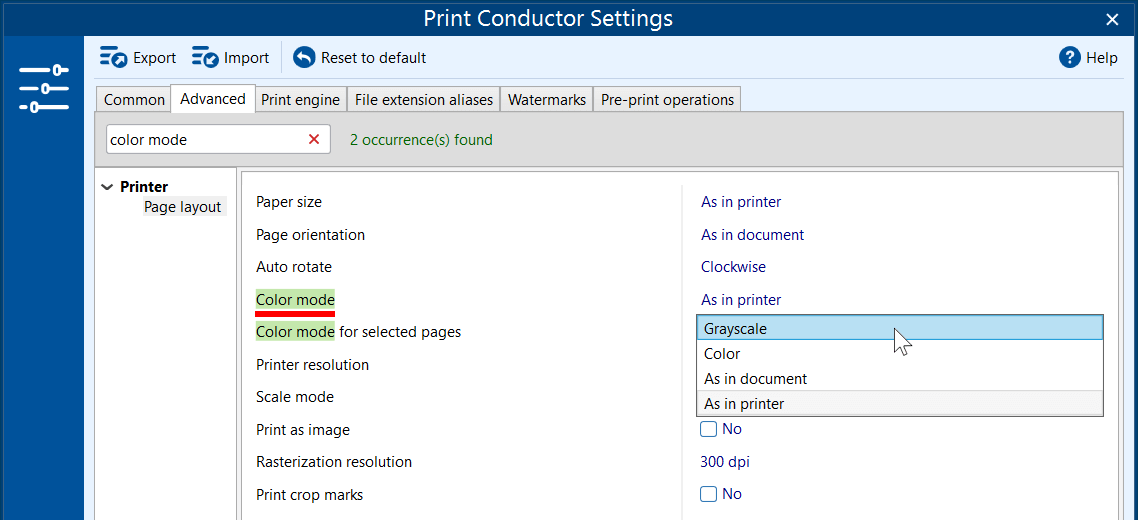
You can also try setting Color mode directly in Print Conductor's Settings. Please note that this will apply selected color mode to all items in the List of Documents and override color mode applied in your Printer Properties (see method described above). To do this, open Settings → Advanced and find Color mode. Choose Grayscale to force pure black-and-white printing (saves color ink).
Alternatively, select As in document to print each page in its original colors: the software will print a page in color if it contains any colored pixels.
Adjust these settings in Print Conductor before starting the job for consistent B/W or color output.
How to change page orientation when printing DOC or DOCX files
Normally each Word file has its own orientation (Portrait or Landscape) set under Layout → Orientation in Word. Batch printing will use each document’s orientation by default.
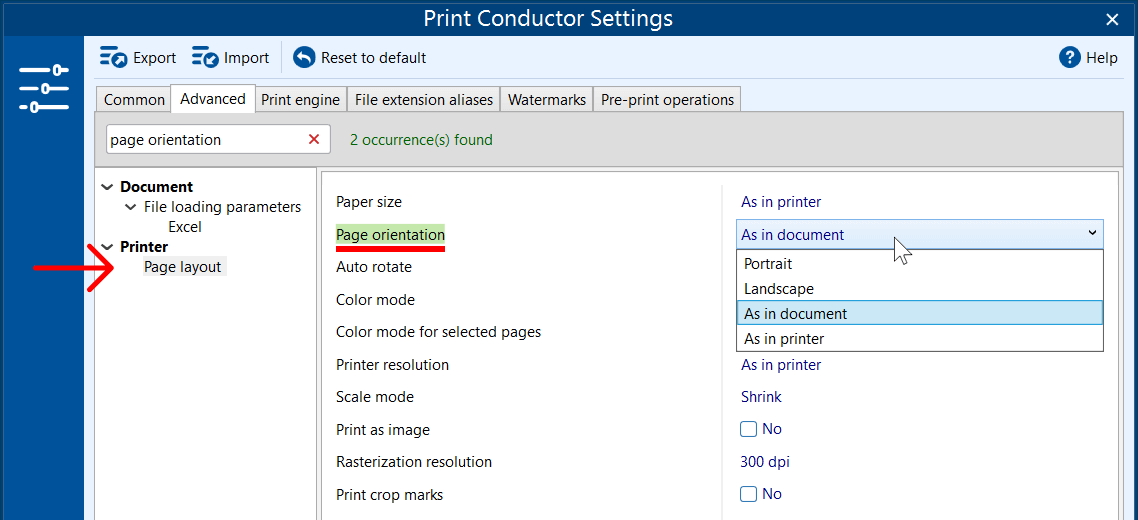
However, when printing Word documents (.doc, .docx), it may be necessary to check the page orientation in advance. By default, Print Conductor applies the document's original page orientation (As in document), but you can override or enforce orientation via Print Conductor – to Portrait, Landscape, or As in printer – according to your needs.
Learn how to select page orientation in Print Conductor
Auto-rotate (optional)
Print Conductor auto-detects and rotates pages. In Settings → Advanced, search for Auto rotate and modify it. The program will rotate pages clockwise or counterclockwise so that each document fits the paper best. Disable this feature if it misaligns your content.
Applying Word's Update Fields, Hide Revisions/Comments, and other print options
Word can update fields (like dates, cross-references, or table of contents) automatically before printing. Before adding Word files to Print Conductor, we recommend keeping auto-updating fields enabled: in Word go to File → Options → Display and check "Update fields before printing". This ensures merged data, page numbers, and dates are current in your printed output.
Options like Update fields before printing or changing Print Markup are available in Word. And the same works when working with Print Conductor – just enable or adjust these settings according to your needs in the Advanced Settings.
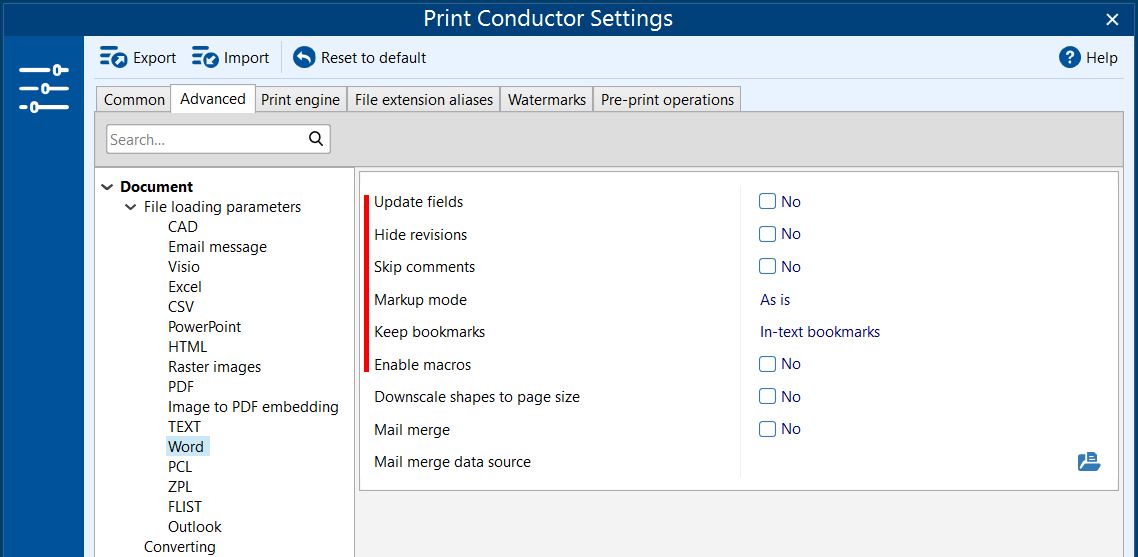
These Word-specific settings can be found in Print Conductor Settings → Advanced → Document → File loading settings → Word.
| Update fields | Automatically update dynamic fields in Microsoft Word files (e.g., [Date], [Time], [Name]). As a result, the up-to-date values of Microsoft Word's built-in dynamic fields will be displayed in the printouts. |
| Hide revisions | Process Word documents without revision marks, e.g., inserted and deleted text, formatting changes, moved paragraphs (they may remain in the document, just not printed). |
| Skip comments | Process Word documents without comments if they were made inside of a document. This hides any comments on the printed pages (they may remain in the document, just not printed). |
| Markup mode | Select which revisions should be displayed on the output printout: balloon, inline or mixed revisions (or keep them as in the original document) |
| Keep bookmarks | Select which bookmarks should be displayed on a document: in-text, heading bookmarks (or disable all) |
| Enable macros | Enable or disable macros when processing a macro-enabled Word document |
Printing Word documents with external data
If you're printing Word documents with some data that can be loaded from a separate file, this is usually a separate Excel file that is required to pull data from, serving as a data source. For such scenarios, there's a parameter to specify the file containing external data in Advanced Settings → File loading settings → Word → Mail merge, Mail merge data source.
Changing print engine if DOC or DOCX files are not correctly rendered
Sometimes there might be some issues with printing Word files, e.g., page numbering looks wrong or the visuals look different from the original after printing. If a Word file looks wrong or won’t print, you may need to change the engine or install Microsoft Word to be used as additional software.
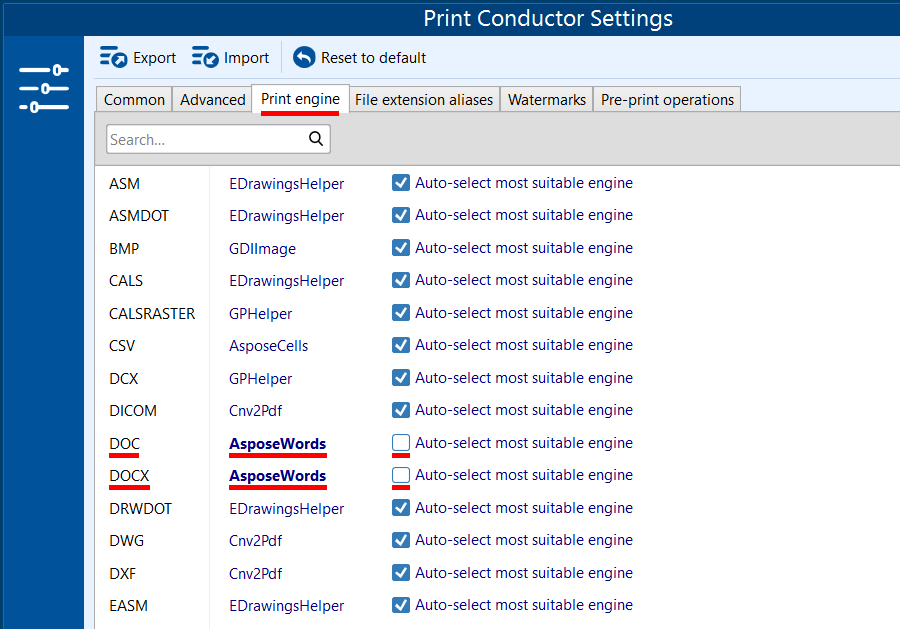
If that's your case, try changing to another print engine in Print Conductor Settings → Print engine → DOC, DOCX. You can choose between built-in engines Cnv2PDF, AsposeWords, Word or WordPad and try printing one of your files as a test to make sure everything prints as expected. Changing the print engine can fix formatting problems and missing content.
To change the print engine:
- Open Print Conductor Settings → Print engine;
- Select Cnv2Pdf (or another print engine) next to DOC and DOCX;
- Disable Auto-select most suitable engine;
- Click OK to apply changes and try printing your files again.
Printing Word files if they have non-standard file extension (other than .doc or .docx)
Sometimes Word documents may have other extensions (e.g., XML) but are essentially and structurally DOC or DOCX. If that's the case, map your custom extension to a supported format. For example, you can associate XML with the Word (DOCX) format.
"We have a whole load of Word files but they are XML, not DOC or DOCX. When we try to print them, they get printed using Notepad, is there any way we can print them as Word documents?"
— request from a customer.
To associate non-standard extension files with supported formats:
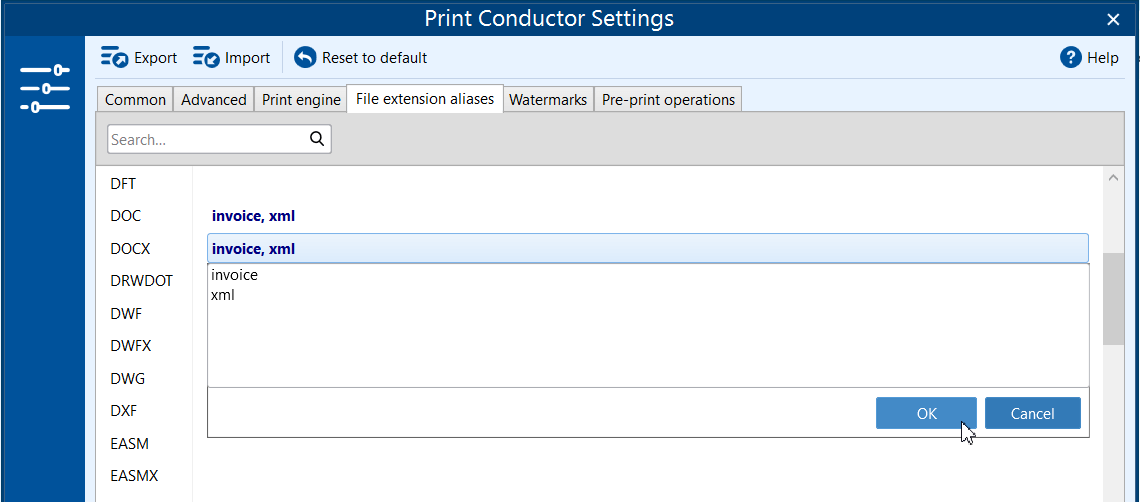
- Check your file extension. For instance, if you have files like "Document.invoice", copy the extension "invoice";
- Open Print Conductor Settings → File extension aliases and click next to the format you want to associate your files with;
- Add the file extension in the dropdown list next to the selected format and click OK.
For example, if you have [filename].invoice files that are structurally Word documents, associate your *.invoice files with DOCX format. This tells Print Conductor to treat *.invoice as Word documents. You can do the same for PDF, text files, etc.
Note: Print Conductor already auto-maps some extensions (like .txt, bat, cmd, and more). Use aliases only for unusual types.
Additional software for Word documents processing
By default, Print Conductor uses Microsoft Office Word API designed for developers to print DOC and DOCX files if MS Word is installed. DOCX files can be batch printed hassle-free if you have Microsoft Word 2010 (or newer version) or OpenOffice installed.
However, if Microsoft Word is not installed on your computer, there is no problem. Print Conductor starting from version 8.0, can print both DOC and DOCX files even if you don't have any office suite installed. The program will be using its internal engine to process these filetypes.
Questions or issues?
Batch printing multiple Word documents is fast and easy with Print Conductor. You avoid repetitive tasks, maintain consistent settings across files, and free up your time. If you run into any problems, try our troubleshooting tips or adjust Print Conductor’s settings as described in this article.
If you have any issue with printing Word documents, please don't hesitate to contact our development team for prompt assistance.
You may also like to read:
- Document Printing Settings
- How to Print Multiple Pages Per Sheet
- How to batch print HWP (Hanword Document) files (format similar to Microsoft Word DOCX)